Your first sprite in five minutes
From a 3D model to a sprite sheet: import, camera, action, look, export. We use the treasure chest from the free library; any model works the same way.
Sample project
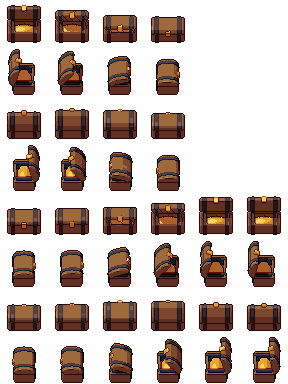
First sprite: a treasure chest: the .pixor project and its library model (CC0). The sheet on the left is what it renders.
Beginner · about 5 minutes
1. Get a model
Download the treasure chest from the free library (the .glb is enough), or use a model of your own. The chest has two animations, Open and Close, which makes it a good first model: small, simple and animated.
2. Import it
Start Pixor and drag the .glb onto the window. That makes a project and imports the model in one go. (Or use Import… in the header, Ctrl+I.)
The sprite appears in the middle, seen through the main camera, with the 3D scene beside it. The model’s Import section says what arrived (parts, materials, clips) and what Pixor corrected, if anything. The orange cross under the chest is the pivot: it stays on the same pixel in every frame and from every side, so the sprite never swims.
3. Set up the camera
You are in the Scene step. In the Outliner, click South under Cameras: a camera is one side of the sprite, and South looks at the front.
- Game sets the camera up for a kind of game in one click. Try Top-down RPG.
- Width and Height set the canvas: 48 pixels suits the chest.
- For more sides, Ring round the model in the camera’s Inspector puts 4 or 8 cameras round it, one per side. Pick 4.
4. Choose what moves
Open the Action step. The Actions list holds the chest’s clips: click Open to play it in the 3D view. It plays smoothly in 3D; the frames come later.
5. Choose a look
Open the Style step and change the Preset on the right: selout gives the selective outlines pixel artists draw by hand, clean a dark outline, retro4 four shades, flat no shading. The 2D View shows the sprite as you change it. Every stage of the look is a node in the Style graph below it, for later.
6. Export
Click Export in the header. Choose the Asset pipeline (the default one writes a sprite sheet) and a folder, and confirm. Pixor writes a PNG sheet with one row per action and side.
That’s it: a pixel-art sprite sheet from a 3D model. Save the project (Ctrl+S): the same project always gives the same pixels, so when the model changes you open it and export again.
Next
- A spinning coin: an animation from nothing.
- An 8-direction walking character.
- How Pixor makes the pixels.
Questions
Which 3D formats can I start from?
glTF or GLB, FBX, OBJ with its materials, or a MagicaVoxel .vox file. Drag the file onto Pixor’s window.
Can I do this in the free browser demo?
Yes: importing, the camera, the action and a PNG sheet in the default look all work in the demo. Other looks and formats are in the desktop app.