Exporting to engines
The Export window
Export (Ctrl+E) sits right after Import in the window header, and opens a window drawn like Import’s (D51):
- Asset pipeline — the one the header’s Asset select shows, to start with. What it writes is designed in the asset graph.
- Export folder — type a path, or Choose… one. The project keeps it.
- Export now — the project as it is open, saved or not: exporting never saves it, and an untitled project exports as it is.
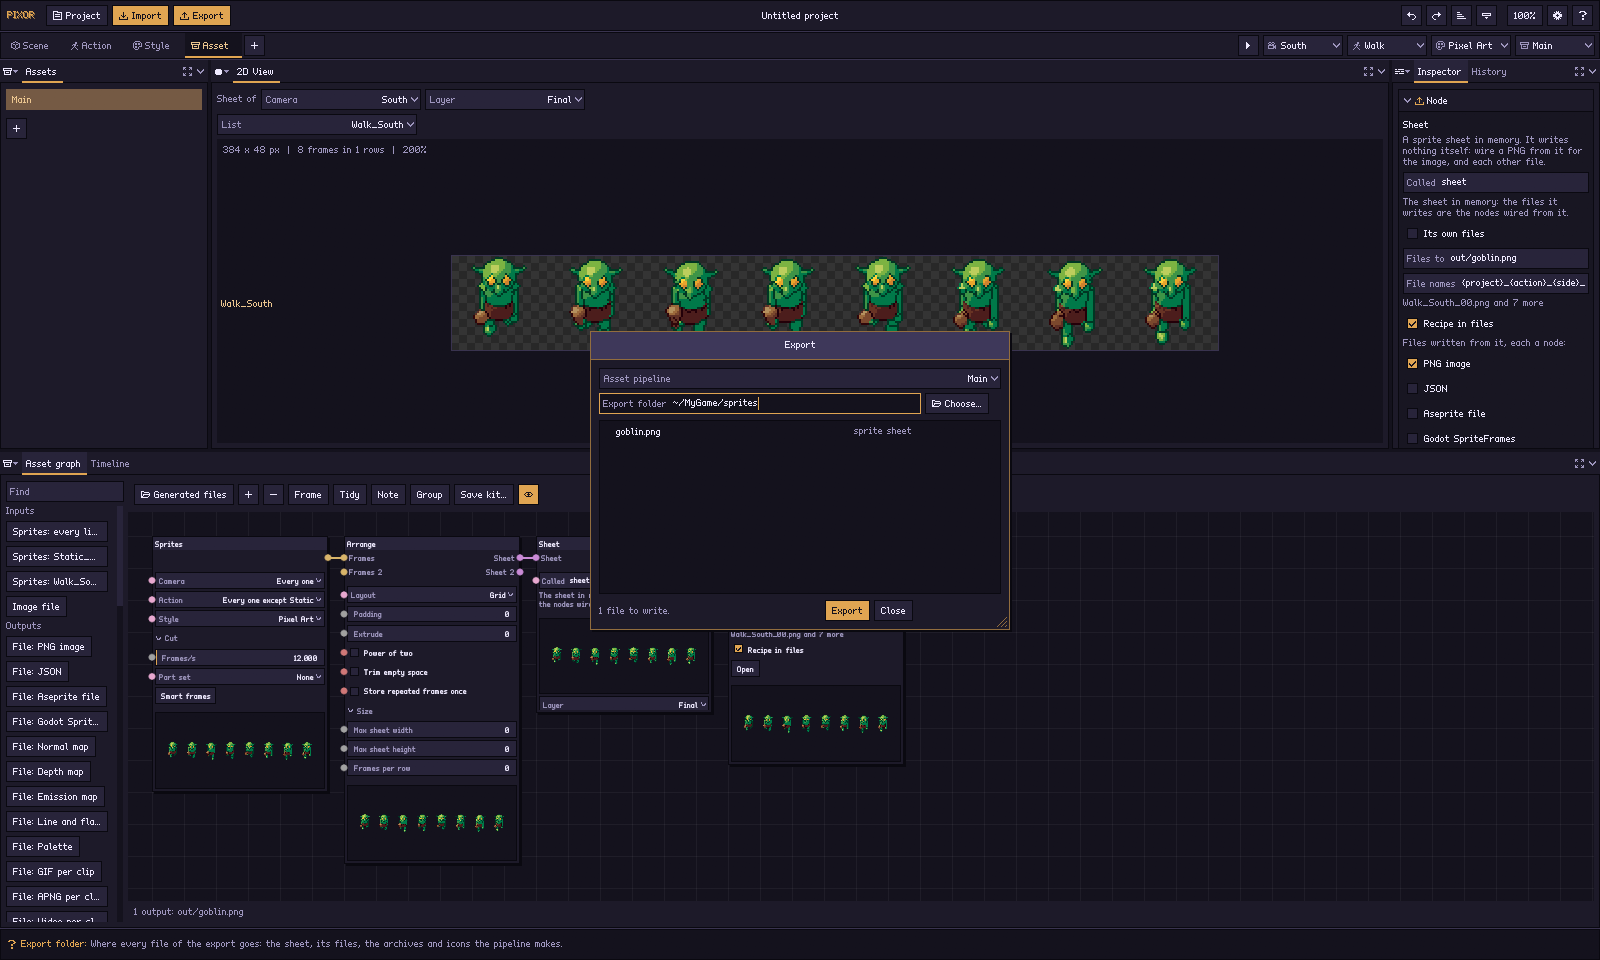
Before you press Export the window lists every file the export will
write, as pxr names names them: each by its path in the folder and its
kind (sprite sheet, JSON, GIF…), and will replace on a file the folder
has already. The list is found again — with a small loader, never holding
the window up — when you change the Asset pipeline, the folder or the
project. A pipeline that cannot be exported as it is (two outputs writing
one file, say) says why there, and Export waits until it is fixed.
Pressed, those same rows, in their places, are the export: each with a loader until it is written, then a tick, its size, Open (in the program your system opens it with) and Show folder. What goes wrong is said on the file it stopped on. Stop ends an export half way: what was written stays, the file being written is removed. The window can be closed while it runs; Export opens it again.
It runs exactly what the command line runs: pxr render PROJECT --pipeline NAME -o FOLDER, in a process of its own, so Pixor stays
responsive — on a snapshot of the project as it is open, written to the
generated folder (with its files’ paths made absolute) and removed when
the export ends. The files are named as pxr render names that project’s:
after the project, or an untitled one after its model. Every file is written fresh from the
pipeline: what the Asset graph’s nodes Generate is never copied.
Every file goes into the folder. The sheet takes its file name from the
project’s PNG node (out/hero.png writes FOLDER/hero.png); a file whose
path is under the sheet’s folder keeps its place below FOLDER, and any
other path (an archive, an animation, icons named elsewhere)
keeps only its last part.
What an export writes
Every export writes a sheet: one row per action and side, one column
per frame, all cells the same size, with the pivot on the same pixel in each.
Add File nodes to the sheet in the asset graph (or use
--export on the command line) to get files next to it with the same
name. Each is a node wired from the sheet, with its own settings.
--export all writes every format below except p8 and video, which
are written only when named: a cartridge fits only a sheet made for one,
and an uncompressed video of every clip and side can be gigabytes. No two
of them write one file: pxr names refuses a project where two would.
| Format | File | For |
|---|---|---|
| png | name.png |
the sheet, an indexed PNG (index 0 transparent) |
| json | name.json |
cell rectangles, frame durations, a tag per action and side, the pivot. Aseprite’s “array” layout, so importers written for Aseprite read it |
| aseprite | name.aseprite |
an indexed Aseprite file: layers final, lines, flat, and one per extra output of the style graph; a tag per action and side; per-frame durations; a pivot slice |
| normal | name_normal.png |
a normal map with the same layout, for 2D lighting |
| depth | name_depth.png |
depth with the same layout: white the nearest, dark the farthest, one scale for the whole sheet (meta.pixor.depth gives both in metres); transparent where nothing is. For sorting, fog and 2.5D lighting |
| emission | name_emission.png |
each glowing pixel in its own colour, as bright as it glows (a glowing material, or the model’s emissive map); transparent elsewhere. For glow and bloom |
| layers | name_lines.png, name_flat.png, and name_LAYER.png for each extra output of the style graph |
the line and flat-colour layers as sheets, and a node’s picture where the Style graph names one |
| palette | name.hex, name.gpl |
the palette (Lospec and GIMP formats) |
| godot | name.tres |
a Godot 4 SpriteFrames resource |
| gif | name_walk_Southeast.gif, … |
one animated GIF per action and side, holds as frame delays, for sharing and previews |
| apng | name_walk_Southeast.apng, … |
the same as animated PNGs, with exact millisecond delays |
| video | name_walk_Southeast.avi, … |
one video per action and side: an uncompressed AVI, every pixel as it is, for a trailer or a store page |
| light-kit | name_ramps.png, name_normal.png, name_light.png, shaders |
palette-correct lighting in engines (see below) |
| report | name_report.png |
the sheet with every check’s findings marked (see below) |
| p8 | name.p8 |
a PICO-8 cartridge (see Console modes) |
| zip | the path on its node | a ZIP archive node in the asset graph: the files wired into it, or everything the export wrote |
A row is named for its action and side: walk_Southeast.
Which frames a sheet takes, how they are arranged and how many files one render writes is the asset graph’s: one Sheet node and its File nodes until you rewire it.
What the frames are called, and what they are
Every frame in a sheet has a name and an id, and they answer two different questions.
The name is a template, a pattern over your project’s own words, so the plain default is what a beginner wants and a studio can obey a convention it did not choose:
{project}_{action}_{side}_{index:2}.{ext} hero_walk_East_00.pngThe words are {project}, {object}, {action}, {side}, {layer},
{set} (the part set a Sprites node drew the frame with), {size}, {index} and
{ext}. {index:3} pads a number with zeros to
three digits. {{ and }} write a brace. A word Pixor does not know is
an error when you type the template, not a file called
hero_{genre}_00.png, and a word with nothing in it takes the separator
before it with it, so a sprite with no side is hero_Static_00.png.
A value that cannot be part of a file name (/ \ : * ? " < > |) is
refused rather than quietly replaced; a space becomes _. The one
exception is Pixor’s own word: a library clip called lib:walk is
lib-walk in a name, because that colon is Pixor’s and not yours.
Two frames that would land on the same name are refused before anything
is rendered. Set it with --names on the command line, or keep it in
the project:
pxr project set hero.pixor --names '{object}/{action}-{side}-{index:3}.{ext}'
pxr names hero.pixor                  # what it will write, without rendering
pxr names hero.pixor --json           # the same, for a build script
The id says what a frame is, never where it landed. It is a hash of
the object, the action, the side, the time in the action and the layer,
and it is written beside every frame in the JSON and in the .aseprite
user data. Re-packing a sheet, adding a clip or changing the padding moves
rectangles and leaves ids alone, so a build that refers to frames by id
does not break every time the packer runs. Re-sampling a clip at another
frame rate does change its ids, because those are different frames.
Smaller sheets
On the asset graph’s Arrange node (or on the command line):
- Trim empty space (
--trim) cuts each frame down to its pixels. The JSON gives each frame’s place in the full cell (spriteSourceSize,trimmed: true) and the Godot file sets each frame’smargin, so engines still place every frame on the pivot. - Store repeated frames once (
--dedupe): frames that are exactly alike (held poses, sides of a still object) share one spot. - Max sheet width (
--max-width 4096) starts a new row before the sheet gets wider, for engines and GPUs with a texture size limit. - Max sheet height (
--max-height 2048) splits a sheet taller than that into pages, whole clips to a page:hero_1.png,hero_2.png, each with its own JSON and the other files beside it. - Frames per row (
--columns 8) puts that many frames on a row, every clip running on after the last: a contact sheet, or the fixed grid an engine’s importer asks for. - A side drawn from another (the asset graph’s Flip node): a
left-right symmetric model looks the same from the left as a flipped
view from the right, so the west side need not be rendered at all — take
the east camera’s sprites, flip them as
West, and the sheet haswalk_Westdrawn fromwalk_East, pixels, normals, boxes and root motion mirrored. Render only the cameras that differ; flip the rest. - Every side’s degrees are in the JSON: on each frame (
pixor.degrees) and, for all of them, undermeta.pixor.sides({"South": 0, "Southeast": 45, ...}): degrees from the front, counter-clockwise seen from above, as--sidestakes them. A game turns an angle into a row with that table.
Shadow layer
Shadow layer (--shadow contact or --shadow drop) writes
name_shadow.png, laid out like the sheet: black where the shadow falls,
transparent elsewhere. Contact is a blob under the feet sized to the
model’s footprint; Drop is the silhouette cast on the ground away from the
key light. Draw it under your sprites with the opacity you like, or sort it
separately. An asset graph’s Layer node can name shadow, and an
Overlay puts it under the sprite in one sheet (Asset graph).
Colour cycling at run time
With cycling materials, the JSON lists each one under meta.pixor.cycles
("material" and its "indices" in the palette, in cycle order), and
Pixor writes name_index.png, the sheet as palette indices. An engine can
rotate those palette entries each tick instead of storing more frames.
Other materials that share the same shades cycle with them, as in any
palette cycling; give a cycling material its own colours to keep it apart.
Scenes of several models, and parallax backgrounds
A project can hold more than one thing: models arranged on a ground plane and rendered as one picture, with one light and shadows between them — a village corner, a dungeon room, a camp, store-page art from the free library.
Each one is an item: a model, where it stands, which way it faces and
how big it is — an Item node of the Scene graph,
added to the end of its chain, which a ring or a scatter after it repeats.
On the command line, each --item is one:
pxr project new camp.pixor \
  --item tent.glb@-1.8,-1.6,25,1.2 \
  --item campfire.pixoritem@0,0 \
  --item barrel.glb@2,1,0,1,2 \
  --ground 7,5,#5d7a45 \
  --size 200
pxr render camp.pixor
@x,z[,yaw[,scale[,layer]]] is where an item stands (metres, x right, z
towards the camera); --ground W,D[,#rrggbb] puts a ground plane under
them. Add :clip[,phase] and that item plays a clip of its own, at its
own point of it, while the ones beside it stand still. Paths are relative
to the project.
Parallax layers (a Parallax layers File node, 2 to 8 layers, or --parallax N) split the
picture by depth into layers for a scrolling background: each is rendered
alone on the same stage and palette, and farther layers fade darker and
bluer towards the haze colour (--haze), the way distance looks
(Haze far layers off, or --haze none, keeps every layer on the palette
as it is, for a game whose palette is fixed). An
item’s layer puts it in a layer (0 is the farthest); the others are
shared out by depth. Pixor writes name_layer0.png, name_layer1.png,
…, name_parallax.json (each layer’s image and a suggested scroll speed,
from 0.25 for the farthest to 1 for the nearest) and name_parallax.png,
the layers stacked. Any model can be split, not only a scene of several.
An asset graph’s Layer node names a layer as layer0, layer1, … to put it on
a sheet of its own making (Asset graph). pxr project set --parallax N --haze #rrggbb|none sets both on a project.
Console modes
For homebrew and fantasy consoles, pick a Console under Style (or
--console). Pixor then uses the console’s own colours and its limits:
| Console | Colours | Per sprite | Notes |
|---|---|---|---|
| Game Boy | the 4 green shades | 3 + transparent | shades by lightness |
| NES | the 54-colour master palette | 3 + transparent | checked per 8 × 8 tile too |
| PICO-8 | its 16 | all 16 | export a .p8 cartridge (tick p8; the sheet must fit 128 × 128: set a maximum width of 128) |
| TIC-80 | its 16 (Sweetie 16) | all 16 | import the PNG with TIC-80’s import sprites |
| C64 | its 16 | 3 + transparent | multicolour sprites: pixels twice as wide; keep the width even (C64 sprites are 24 px) |
Where a sprite may use only three colours, Pixor picks the three console
colours that best cover your model in shadow, base colour and light, so
every frame and side uses the same three. The Style section says
whether the frame on screen fits; pxr console check sheet.png checks a
whole sheet (colours, colours per frame and per tile, double-wide pairs,
size) and reads the console from the recipe inside the sheet. Every
render in a console mode runs the same check on the sheet it wrote, and
fails (exit status 1, the problems listed) when it does not fit. A palette
of your own is kept under a console mode, not replaced by the console’s —
so a sixteen-colour palette on a Game Boy is said, loudly, rather than
quietly swapped for the four greens. The NES
colours are computed by Pixor from the console’s video signal, the others
are the consoles’ published values.
Palette-correct lighting in engines
Engines light sprites from normal maps with smooth shading, which brings in
colours your palette never had. Tick Light kit (or --export light-kit)
and sprites react to in-game light while every lit pixel stays on a step
of its own colour ramp, with Pixor’s bands, hue shift and highlights.
Pixor writes, next to the sheet:
| File | What it is |
|---|---|
name_ramps.png |
each pixel’s colour ramp (ramp number + 1 in red; 0 for pixels light doesn’t touch, like lines) |
name_normal.png |
the normals, view space: x right, y up, z towards the camera |
name_light.png |
the lookup: a row per ramp, a column per light level, then the highlight colour, then two columns that are not colours at all — that ramp’s own highlight thresholds, because a glossy or metal material takes its highlight more easily than a matte one |
pixor_palette_light.gdshader, name_light.tres |
the Godot shader and a material with every texture set: put the material on a Sprite2D or AnimatedSprite2D |
PixorPaletteLight.shader |
the Unity shader: make a material with it for a SpriteRenderer and set its three maps |
pixor_palette_light.fsh, .vsh |
the GameMaker shader; the comments show how to bind the maps |
The shaders light with one key light (light_dir, towards the light, in
the normals’ space), the preset’s fill light, and specular and rim
highlights whose thresholds come from the lookup texture, per ramp, as
Pixor’s own did. Setting specular or rim to a number between -1 and 1
overrides them for the whole sprite; above 1 turns those highlights off;
below -1 (the default) uses the lookup’s. A highlight is drawn only where
one of the four neighbouring pixels takes one too, which is Pixor’s own
rule against a lone bright pixel — min_highlight 1 turns that off. Move the light from a script, for
example towards a torch: material.set_shader_parameter("light_dir", dir).
Import the three maps with no filtering, no compression and no mipmaps.
To see it before exporting, turn on the 2D lighting preview (L) over the
sprite and choose Light as: the light kit: the light turns towards the
pointer and the frame is lit through the same lookup, by the same rules
(highlights only beside another, pixels with no ramp untouched), as the
shaders light it.
With the render’s light a frame looks exactly as Pixor drew it (the
exceptions are a few pixels at band edges); cast shadows, dithering and the
flicker smoothing of animated sheets are Pixor’s alone, so turn cast
shadows off for sheets you light in the engine. The JSON lists the files
and the light under meta.pixor.light_kit.
Palette variants
Add variant (--variant NAME, repeatable) exports the same sheet in
other colours. Pixor draws in palette indices, so a variant changes only
the palette: every pixel, line and shade stays where it is.
- Effects:
hit-flash,frozen,poisoned,petrified,burning,silhouette,selected, the times of daydawn,noon,dusk,night, and the seasonsautumnandwinter(greens turn orange, or pale and snowy). - Team colours:
team:blue(orred,green,yellow,purple,orange,teal,pink,white,black, orteam:#3050e0) recolours only the team colour — the materials or colours marked with--teamor under Materials — and leaves skin, steel and gold as they are. Each shade keeps its lightness, so the ramp still reads. Four teams from one sprite:--team cloth --variant team:red --variant team:blue --variant team:green --variant team:yellow. The JSON lists the team’s palette indices undermeta.pixor.team, for engines that recolour at run time through the lookup texture below. - Every colour turned:
hue:120turns every coloured shade by 120 degrees; greys stay grey. - Other palettes:
palette:pixor-8orpalette:my-colours.hexmoves every colour to that palette’s nearest one, keeping light and dark apart.
Each variant is name_<variant>.png. With any variant, Pixor also writes
two files for swapping palettes at run time, so one sheet serves every
tier and team:
name_index.png: the sheet with each pixel’s palette index as a grey value (0 is transparent);name_lut.png: a lookup texture 256 pixels wide, one row per palette (row 0 the sheet’s own, row k variant k).
A shader looks up lut(index / 255, row). The JSON lists the variants and
their rows under meta.pixor.variants.
The recipe inside every export
Every file Pixor exports remembers the project that made it: the sheet,
its layer sheets and maps (_lines, _flat, _normal, _depth,
_emission, _shadow), its palette variants and index sheet, the
.aseprite, and each GIF (in a comment) and APNG. Drop any of them on Pixor (or choose it in Open project) to get the
project back: the .pixor file if it is still there, or a new project
rebuilt from the recipe. Paths are stored relative to the exported file;
a path that can’t be made relative keeps only its file name, so a sheet you
share doesn’t show your folder names. Untick Recipe in files (or pass
--no-recipe) to leave it out.
Godot 4
- Copy
name.pngandname.tresinto your project, side by side. - The
.tresloads the sheet fromres://name.png. If you put it somewhere else, pass--godot-path res://path/name.pngwhen exporting from the command line, or edit the path at the top of the.tres. - Create an
AnimatedSprite2Dand set its Sprite Frames toname.tres. Every action and side is an animation, looping, with its frame holds. - For crisp pixels set Texture > Filter to Nearest.
Unity
- With the Aseprite Importer package (2D Aseprite Importer): drop
name.asepriteinto Assets. Each tag becomes an animation clip; use thefinallayer. - Without it: import
name.pngas a Sprite (Multiple), Filter Mode Point, Compression None, and slice it by cell size (the cell size is inname.jsonundermeta.pixor.cell). The pivot is inmeta.pixor.pivot, in pixels from the cell’s top-left.
GameMaker
Import name.png as a sprite strip: use a Strip layout export
(--layout strip) per animation or cut the grid by cell size. Set the
origin to the pivot from name.json.
Aseprite
Open name.aseprite, or click Open on the Aseprite file node (Pixor
finds Aseprite on the PATH and in the usual Steam and itch folders, and
asks where it is otherwise). The tags list every action and side. The
final layer is visible; lines and flat are hidden helpers for
touching up by hand, and so is each extra output the style graph names, above
final. The file is in indexed mode with Pixor’s palette.
Paint over it and keep your work. Add your own layers and paint, then change the model or the look in Pixor and re-bake:
pxr rebake out/hero.asepritePixor owns what it wrote, and nothing else. A re-bake renders the project again and:
- replaces the pixels of the layers Pixor made (
final,lines,flat), where nobody has painted on them; - leaves your layers exactly as they are — never moved, renamed, reordered
or recoloured — with each painted cel on the frame it was painted on.
Every frame carries an id made from what it is (action, side, time), so
if the walk gains three frames in the middle, your painted eyes stay on
their own poses rather than sliding onto new ones — and the re-bake says
so, frame by frame:
moved your paint on frame 1 is on frame 2 now, and which frames are new (movedandnew_atin--json); - keeps every colour you painted with at its index, adding new colours at the end of the palette — or, on a sheet you turned greyscale or RGB in Aseprite, writes the render in greys or in colours to match;
- keeps your slices, their keys on the frames they were on, wherever those frames went;
- marks frames where the model moved out from under your paint with a tag,
pxr check, and leaves the paint where it is.
Two things it will not decide alone, and keeps both of until you do:
| What happened | What the re-bake does |
|---|---|
| You painted on one of Pixor’s own layers | Pixor’s layer gets the new render; your edit moves to a layer of your own, final edits, right above it; the frame is tagged pxr conflict |
| A frame you painted is not in the new render (the clip got shorter) | the frame is kept at the end, with your paint, tagged pxr removed |
Nothing is lost either way. pxr rebake then exits with code 7 until you say
which way it goes: --resolve keep keeps your edits as your own layers,
--resolve pixor takes Pixor’s render and drops them. --dry-run says
what a re-bake would do without writing anything, and --json says it for a
tool; the extension asks you the same question in a dialog.
GIF and APNG
Each action and side becomes its own looping file (a clip that doesn’t
loop plays once). The frames use the sprite’s palette, with index 0
transparent. Scale, on the GIF or APNG node (--anim-scale K), enlarges
them by a whole number, from 1 to 16, so a 64 px sprite can go out as a
256 px GIF with every pixel still sharp.
GIF stores delays in hundredths of a second, so each frame’s delay is rounded,
but the total length of the clip is kept. Browsers show delays under 20 ms as
100 ms, so no GIF frame is shorter than 20 ms: above 50 fps the GIF leaves
out the frames that would be on for less, and plays as long as the clip.
APNG stores the exact milliseconds, rounded on the running total like the
JSON’s, so a 12 fps clip’s frames are 83 and 84 ms. Rename a .apng file to .png if a site only accepts PNG.
A clip an asset graph’s Layer node drew animates that layer — the lines
alone, the flat colours — as the sheet shows it; a Layer of the normal,
depth or emission maps animates the sprite, since a GIF holds palette
colours only.
Video
Video per clip writes each action and side as name_walk_Southeast.avi: an
uncompressed AVI, 24-bit colour, which every editor and converter opens and
which loses nothing — no codec smears a pixel. Its node has three settings:
- Scale (1 to 16, 4 to start with): how many video pixels an art pixel is.
- Frames a second (1 to 100, 30 to start with): a video runs at one rate, so a sprite frame is written as many times as it lasts, and the clip keeps its length to within one video frame.
- Background: what is behind the sprite. A video has no transparency.
--export video on the command line takes the starting values, or
--video-scale K, --video-fps N and --video-background #RRGGBB.
--export all leaves videos out: name them.
It is not compressed, so it is big — a 64 px sprite at scale 4 is about
200 KB a frame — and a video over a gigabyte is refused rather than
written. To put it online, convert it: ffmpeg -i hero_walk_South.avi -crf 0 hero_walk_South.mp4.
Plain engines and your own code
Read name.json: frames[i].frame is the cell rectangle and
frames[i].duration its hold in milliseconds; meta.frameTags groups
frames into animations, and a tag that plays once rather than looping
carries "repeat": "1", as Aseprite writes it. frames[i].pixor names the
frame’s tag (its frame tag’s name), its index in it, its action and side, its id,
and its pivot — the point in the cell the engine stands the sprite on,
which is the sheet’s unless a Tag node gave the clip its own. The
pivot slice in meta.slices has a key wherever the pivot changes, and the
.aseprite file’s pivot slice the same keys.
Root motion
A clip exported In place has two more values per frame, in pixels with
fractions kept (x to the right, y down):
frames[i].pixor.root: where the model’s root would be, measured from where it was at the start of the clip.frames[i].pixor.root_delta: how far the root moves until the next frame. For the last frame it is the move until the end of the clip, so looping walks keep going at the same speed.
To move the character as the clip did, add root_delta to the sprite’s
position each time a frame ends.
Inventory icons
pxr icons (or an Icons node in the asset graph, made when the project
is exported) turns models into matching
inventory icons: every model from the same ¾ angle under the Studio light
rig, at 16, 24, 32 and 48 pixels (or --sizes), with the silhouette in the
colour of its rarity (--rarity common|uncommon|rare|epic|legendary) and,
with --framed, on a framed tile like an inventory slot. Each icon is a PNG,
and each size gets an atlas icons_N.png with icons_N.json saying where
each icon is. Point it at a folder to turn a whole pack into an icon set —
in the app, drop the folder on the window and turn on Icons instead of
sprites: the sizes, the rarity (from each file’s name unless you pick one)
and the frame are there, and the recipe is saved beside the icons as
icons.pixoricons:
pxr icons library/pickups --out icons --rarity epic --framed--rarity from-name gives each model the rarity a word of its file name
says (potion_rare.glb, Sword-Epic.glb; no such word is common), and the
JSON says each icon’s. Files are taken in name order, so the atlas is the
same however the folder lists them.
A recipe keeps the pack: --save pack.pixoricons writes the folders and
the settings (paths relative to the recipe), and pxr icons pack.pixoricons
makes the pack again, byte for byte. A prop added to the folder joins the
next run; a flag after the recipe changes one setting for that run
(pxr icons pack.pixoricons --sizes 64).
Voxels and sprite stacks
A MagicaVoxel .vox opens like any other model: every model of its
scene where the scene graph puts it (turned and moved as MagicaVoxel shows
it), its palette, and the voxels of a glowing material glowing. A voxel is
read as a tenth of a metre, +Z up.
pxr voxels MODEL -o hero.vox --height 32 turns any model into voxels,
32 tall: the surface sampled from its textures and colours, the inside
filled, every voxel in the look’s own palette (--preset, --palette and
the other look options), so the voxels match the sprites. With --stack it
also writes a sprite stack: hero_stack.png, the model cut into
horizontal slices side by side, bottom first, each seen from above, and
hero_stack.json with the slice size and count. A game draws slice k one
pixel above slice k - 1 and turns them all together, which is how sprite
stacking fakes 3D.
pxr voxels knight.glb -o knight.vox --height 32 --stack --preset seloutChecking that everything matches
pxr audit folder --style game.pixorkit reads every exported PNG and
.aseprite file in a folder and checks it against the kit, using the recipe
inside each file: preset, light rig, view, camera pitch, key light, light
bands, lines, palette and pixels per metre, and that every colour it uses is
in the kit’s palette. Without a kit, the first file is the reference. Each
difference is listed; any difference makes the exit status 1, so it can
guard a build.
In the app, the consistency board (the three-figures button, Consistency board: every side at once, or B) shows the current frame from every side side by side on one ground line, with each silhouette’s top marked and its width, height and colour count below. Under the button:
- Silhouettes draws every side as its shape alone, in one colour: a pose that does not read as a silhouette does not read at game size.
- Pivots marks the pixel each side stands on and turns about. A side whose feet are off it slides when the sprite turns.
- Colour counts writes each side’s count; the board says when the heights differ by more than a pixel between sides (Heights differ … between sides), or one side has several more colours than another (usually a light only one side catches).
pxr audit above is the folder-wide half: every sheet against one kit.
What the checks found, on the pixels they mean
Every check Pixor makes — stray pixels, line corners drawn in one pixel, thick lines, a colour off the palette, a tile or a frame with more colours than a console mode allows — marks the pixels it is about instead of only printing a line of text at export time.
- In the app: the Checks button over the sprite (the warning triangle) draws the marks on the frame, and the Report section in the Style and Asset steps lists every finding of every frame rendered so far. Click one and Pixor goes to that frame and side with the marks on. Under the list, each kind of finding says which setting decides it — stray pixels the cleanup, jagged corners the lines, colours the palette, console limits the console mode, a flipped side that does not match the export’s mirroring — and Go to opens that setting.
- Mirrored sides: with a Flip node in the asset graph, a side that will be drawn flipped is compared with the one it flips, and where the model is not symmetric enough for that the pixels that change are marked, while you are still choosing — not only a warning at export.
- At export: tick report (or
--export report) and Pixor writesname_report.pngbeside the sheet: the sheet with every finding marked. Single pixels are filled; a tile or a frame is boxed, so what it is about still shows through.
| Colour | What |
|---|---|
| cyan | a stray pixel (an orphan) |
| yellow | a line turning a corner in one pixel |
| magenta | a two-by-two block of line: a thick line |
| red | a pixel off the palette |
| orange | an 8 x 8 tile with more colours than the console allows |
| deep orange | a frame with more colours than the console allows |
| pink | a colour the console does not have |
| violet | a pixel that differs from the side it is mirrored from |
| green box | a part drawn in its plain colour because its texture file is missing: put the file beside the model |
Pixel effects
An Effect node of the Scene graph (listed under
Effects in the Outliner) adds an effect drawn from 3D particles:
Explosion, Hit-spark, Slash, Magic-burst, Heal, Portal,
Smoke-puff, Dust, Fire-loop, Rain, Snow, Fireflies and
Falling-leaves. Each is its own action
(fx-explosion, …), rendered through the same pipeline as the model, so
it takes the sprite’s palette, pixel size, light and lines: it looks like it
belongs in the same game. Set its frames, size, energy, where it is and its
seed (the same seed always gives the same pixels); make it follow a bone (a
slash from the hand, a flash at a muzzle) and play over a clip (the
swing under the slash, or a clip keyed in Pixor); tick Effect only to draw it without the model,
as its own layer aligned with the character’s sheet. Hit frame marks the
frame that lands the hit: the JSON lists it under meta.pixor.hits. On the
command line: --effect fireflies:12 --effect-clip shatter --effect-hit 6,
the clip one made in Pixor too — shards keyed flying under the glitter.
Make an effect on an empty project’s screen, beside Import… and
Browse free models (or pxr effect explosion -o fx.png),
makes an effect with no model at all.
Hitboxes, hurtboxes and sockets
A part’s Box in the Inspector (or --hitbox, --hurtbox) makes it a
hitbox (it deals hits: a sword) or a hurtbox (it can be hit: the body), and
a bone’s Socket in the JSON (or --socket) makes it a socket (a hand, a
muzzle). Every frame’s JSON
then carries pixor.boxes (part, kind, x, y, w, h in cell
pixels, from the pixels each part really covers) and pixor.sockets (each
bone’s position in cell pixels), so game code can check hits and attach
effects without guessing. A model file can mark parts too (pxr.box).
Paper-doll layers
With props attached, Paper-doll layers (--paper-doll) also writes
name_base.png, the model without its props on the same canvas, and one
layer per prop (name_sword.png), its visible pixels with the lines around
them. Stacked base first, they give the full sheet; swapping a prop’s layer
swaps the equipment. name_stacked.png is them stacked that way, as the
engine will stack them: the preview that shows they line up. Every piece’s
pixels are the sheet’s own; the base is the body drawn without the pieces,
so it differs from the sheet only within a few pixels of a piece’s edge,
and where a piece casts a shadow on the body — turn cast shadows off
(--no-shadow) for layers that stack exactly. Rows a Sprites node draws with a
part set belong to that node’s own sheet, not to the layers. (The app makes
them with pxr from the saved project, saving it first when it has
changed, so the layers are what is on screen.)
Equipment that is part of the model — a helmet, a shield, a cape modelled with the character rather than attached as a prop — is a piece:
pxr render knight.glb --clip all --paper-doll --piece helmet:Knight_Helmet --piece gear:Round_Shield,1H_Sword
pxr project set knight.pixor --paper-doll --piece helmet:Knight_Helmet
Each piece names the parts it is made of (as the Outliner lists them) and
becomes a layer of its own, name_helmet.png, exactly like a prop’s (in the
app, a part’s Its own paper-doll layer makes it one, named after it): only
the pixels of it that show, so a shield behind the body is hidden where the
body hides it. The base is rendered without every piece and prop, so what a
helmet covered — the head under it — is drawn there. --no-pieces clears
them from a project. An asset graph’s Layer node names base or a piece or prop
by its name as its layer, to lay the layers out as it likes
(Asset graph).