Quick start
Not sure what something does? Point at it. Every button, field and section explains itself: the right end of the status bar says what the thing under the pointer does straight away, and a moment later a tooltip adds how to use it (drag, type, right-click to reset). Over the sprite, the status bar names the pixel under the pointer: its colour, whether it is a line or a fill, and which part of the model it belongs to.
0. The first start
Each time Pixor opens without a project, it asks what to start with: one of the models that come with it (the goblin, which walks, is a good first choice), Browse free models, or Import…. Pick a sample and you are in the Style step with its finished sprite already on screen — a sensible size, a sensible look, nothing set yet. Change the Preset on the right and watch it change; Export (beside Import) writes the sheet. Look around first closes the screen and leaves the new, empty project open. Untick Show this at startup to start straight on an empty project; Help › The first-run screen brings it back. Opening a project skips it.
1. Start a project and import a model
You work in a project: you make one or open one, and you import
things into it — a model, a library item, a palette, a picture. The project
is the file you save (.pixor); the model file it imported is never
changed.
Start Pixor and drag a model onto the window, which makes a project and imports it in one go. Or use the Project menu at the top left — New project (Ctrl+N), Open project… (Ctrl+O), Save project (Ctrl+S), Save project as…, Save as blueprint…, the recent projects and Quit (Ctrl+Q) — then Import… (Ctrl+I) and Export (Ctrl+E). A new project is Untitled project: click its name in the middle of the header to give it one (Enter keeps it, Escape doesn’t), and once saved the header shows the file too, as Name (file.pixor). Closing Pixor, or opening another project, with changes not saved asks Save changes to NAME? first: Save (Enter), Don’t save or Cancel (Escape). At the right end of the workspace tabs’ row are Play/Pause and the four selects every step shares (Camera, Action, Style, Asset). A model import says what arrived — parts, materials, clips, bones — and what it had to leave out.
What Pixor imports. Import…, and a file dropped on the window, take
any of these; the Import window lists them under Formats Pixor reads, its
Files of type shows all of them or one, and pxr help import prints the
same table (pxr inspect FILE reads every one):
| Format | Extensions | Brings | Notes |
|---|---|---|---|
| glTF | .glb .gltf |
a model, with its skeleton and clips | One .glb, or a .gltf with its .bin and textures beside it or embedded. |
| FBX | .fbx |
a model, with its skeleton and clips | Units and axes made metres, +Y up; Mixamo exports work as they are. |
| Wavefront OBJ | .obj |
a static mesh | With the colours and textures its .mtl names; read as metres, +Y up. |
| MagicaVoxel | .vox |
voxels, as a model | Each voxel a cube in its colour, placed as MagicaVoxel shows them. |
| Pixor library item | .pixoritem |
a library item | A model from Pixor’s library, copied into your Library folder. |
| OpenVDB | .vdb |
a volume | Float and vector grids; numbered files (fire_0001.vdb…) play in turn. |
| Picture | .png .jpg .jpeg |
a picture on a plane | PNG or JPEG; a sprite Pixor exported opens the project that made it. |
| Palette | .hex .gpl |
the Style’s palette | Lospec .hex or GIMP .gpl; the palette field also takes a picture. |
A model replaces the project’s model; a volume or a picture is added to the scene, and a palette becomes the Style’s. Textures are PNG or JPEG.
An import is never your fault. A file straight from a download is often two hundred times too big, far from the middle of its scene, missing a texture, or lying on its back. Pixor corrects what it can be sure of — a unit that is plainly wrong, a model far from the middle, a character or a creature whose skeleton says it is lying down, a cart whose wheels are all on one side — draws a missing texture in the material’s own colour, and says what it did in the model’s Import section, each correction with its own undo. What it cannot be sure of it only suggests: a long, low model may be lying down (or may be a car), and so may one whose flat base is on its back, so it offers Stand it up rather than doing it. Each line of the section selects what it names — the model, or the part drawn plain for a missing texture, which the 3D view also boxes and labels. The model file is never changed. With Warn of too fine a model on in Preferences, a model with far more triangles than its sprite has pixels says so under the sprite: that is why a detailed model can look like mush at 32 pixels. No model? Browse free models opens the free library in your browser (see the FAQ).
A project holds one import; importing a second model (with Import…, or dropped on the window) replaces the first and keeps everything the project decided — the look, the cameras, the lights and where the sheets go. Other models stand beside it: in the Scene step, + › An item › From a model file… adds one, an item of the Scene graph.
Clips in separate files are found automatically when they are named
after the model: knight.glb with knight@walk.glb, knight@idle.glb, and
so on. The files must share the skeleton (bone names are matched). Files
named otherwise (a Mixamo download per clip) are added with + under the
Actions list, Clips from a file…; the project remembers them.
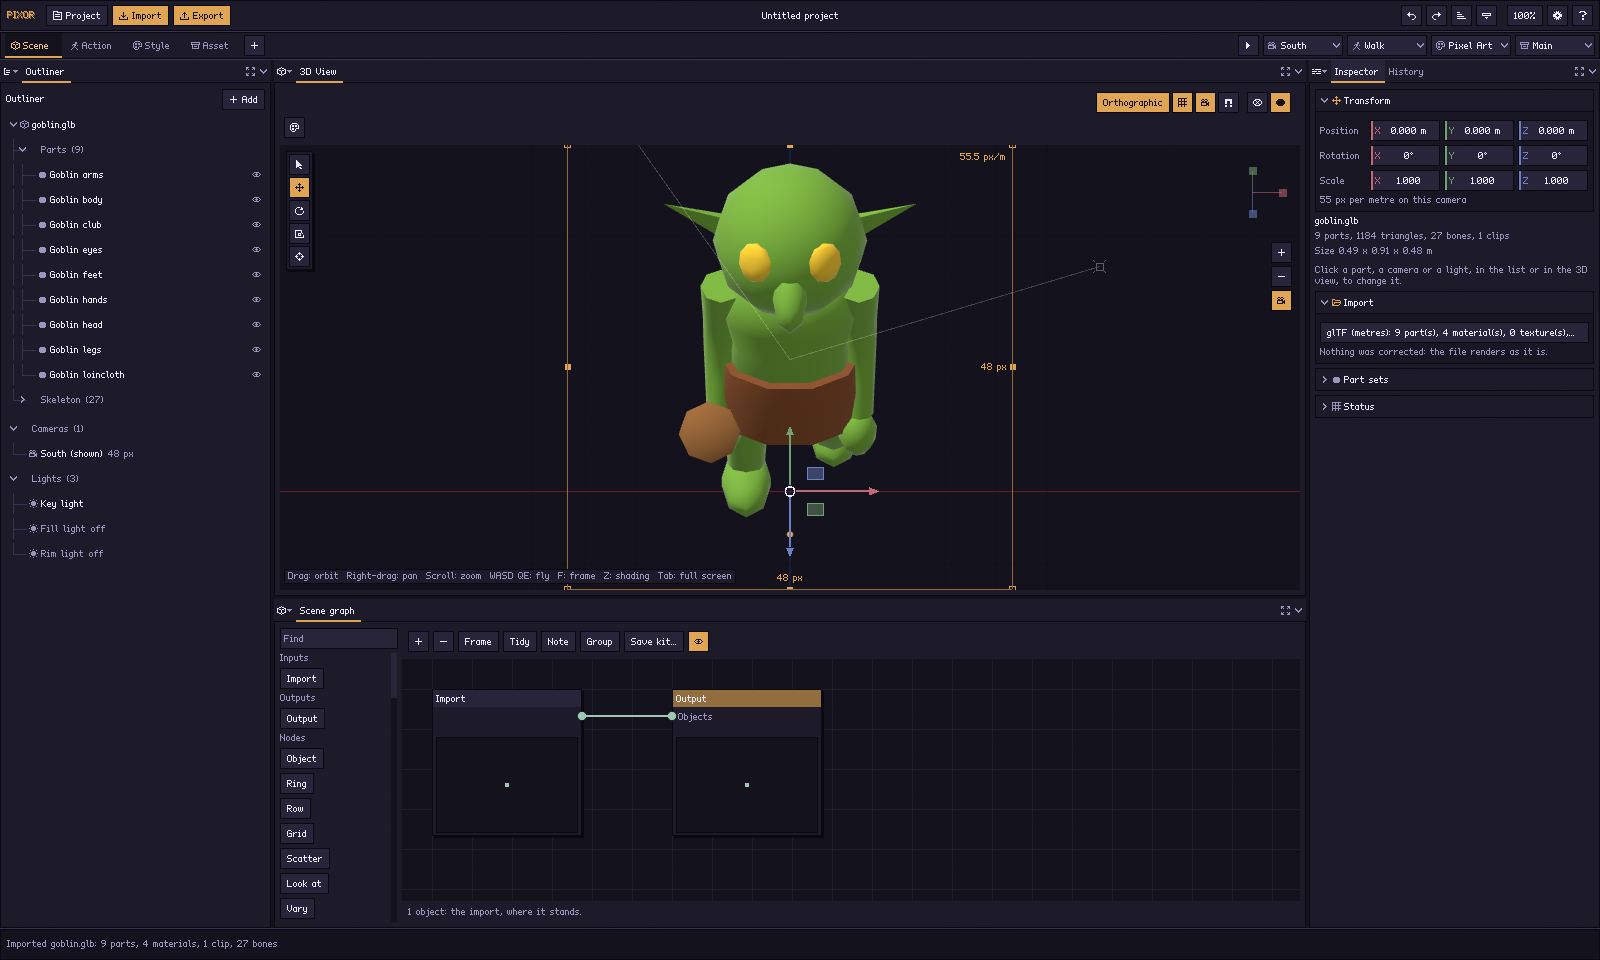
The sprite appears in the middle, seen through the main camera. The orange cross is the pivot: the point under the model’s feet. It is locked to the same pixel in every frame and side, so a character never swims.
The 3D scene is on the right the whole time. Drag to orbit, scroll to zoom (a notch zooms the same in every view, the 2D View and the graphs too), W A S D to fly, F to frame the model, C (over the 3D View) to jump back to the camera, Tab to fill the window with it (any panel, the one under the pointer). The scene explains the whole window, which is four steps across the top: Scene, Action, Style and Asset (keys 1 to 4), each in a workspace tab of its own. A simple job goes through them left to right.
2. Set up the camera
A camera is one side of the sprite. A project starts with one, South, looking at the front. In the Scene step, click South under Cameras in the Outliner. Game sets it up for a kind of game in one click (platformer, top-down RPG, isometric, shooter and more): the angle and the size. Change any of them afterwards:
- View, Pitch and Turn aim it; or fly to the view you like and press Camera from view in the 3D View’s header, or drag the camera in the 3D view.
- Width and Height: the canvas (or drag the sides of its frame when looking through it), or a fixed Pixels/m so all your characters share one scale; Projection: orthographic or perspective.
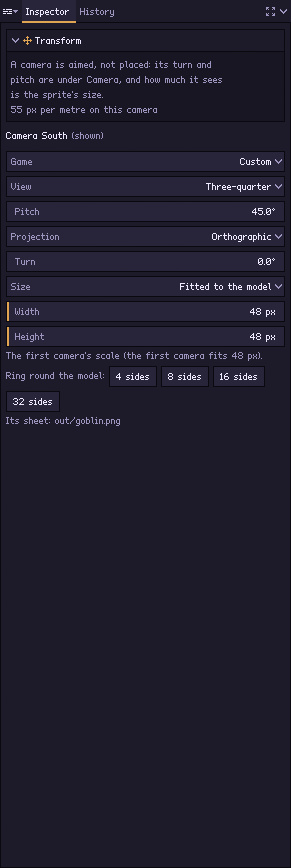
More sides are more cameras. In the camera’s Inspector, Ring round the model puts 4, 8, 16 or 32 round the model, like the first and named for the side each sees: South, Southeast, East, Northeast, North, Northwest, West, Southwest. + › A camera for… a genre that draws eight sides adds eight. Cameras with the same view, pitch and size are framed together: one scale, one palette, and one sheet with a row for each. A camera with different settings — a big portrait beside a small map sprite — writes its own sheet. A side seen from higher up is a camera with a steeper pitch; a turning object is a motion in an action, in Action.
A project can have several Styles. A Style is a pipeline with a
name: a preset, the settings over it and its style graph, and it belongs
to no camera. In the Style step, the Styles list down the left (or
the header’s Style select) chooses which one the Style graph edits,
drawing the header’s camera and action; New Style under it makes
another, a copy of the one shown, named after it (Pixel Art 2). Which camera is drawn with which Style in the files is said in the
Asset step, on its Sprites nodes: a portrait and the map sprite beside it
drawn two ways are two Sprites nodes, each naming its camera and Style.
On the command line: pxr project set game.pixor --add-style portraits.
3. Choose what moves
In the Action step, the Actions list on the left holds the actions (an imported clip is one), with the project’s routines under them. Click an action to play it in the 3D view; how it moves is in the Inspector (root motion, planted feet).
Every action is a network of channels, as Houdini’s CHOPs: shown in
the Action graph beside the timeline, what travels along each wire is
a set of named numbers over time — turn y, part:Lid/turn y. An action
is the motion of the whole scene; an imported clip is one already, its
Clip node into its Output (its length, rate and loop). + there
(or its library) adds a node, playing at once:
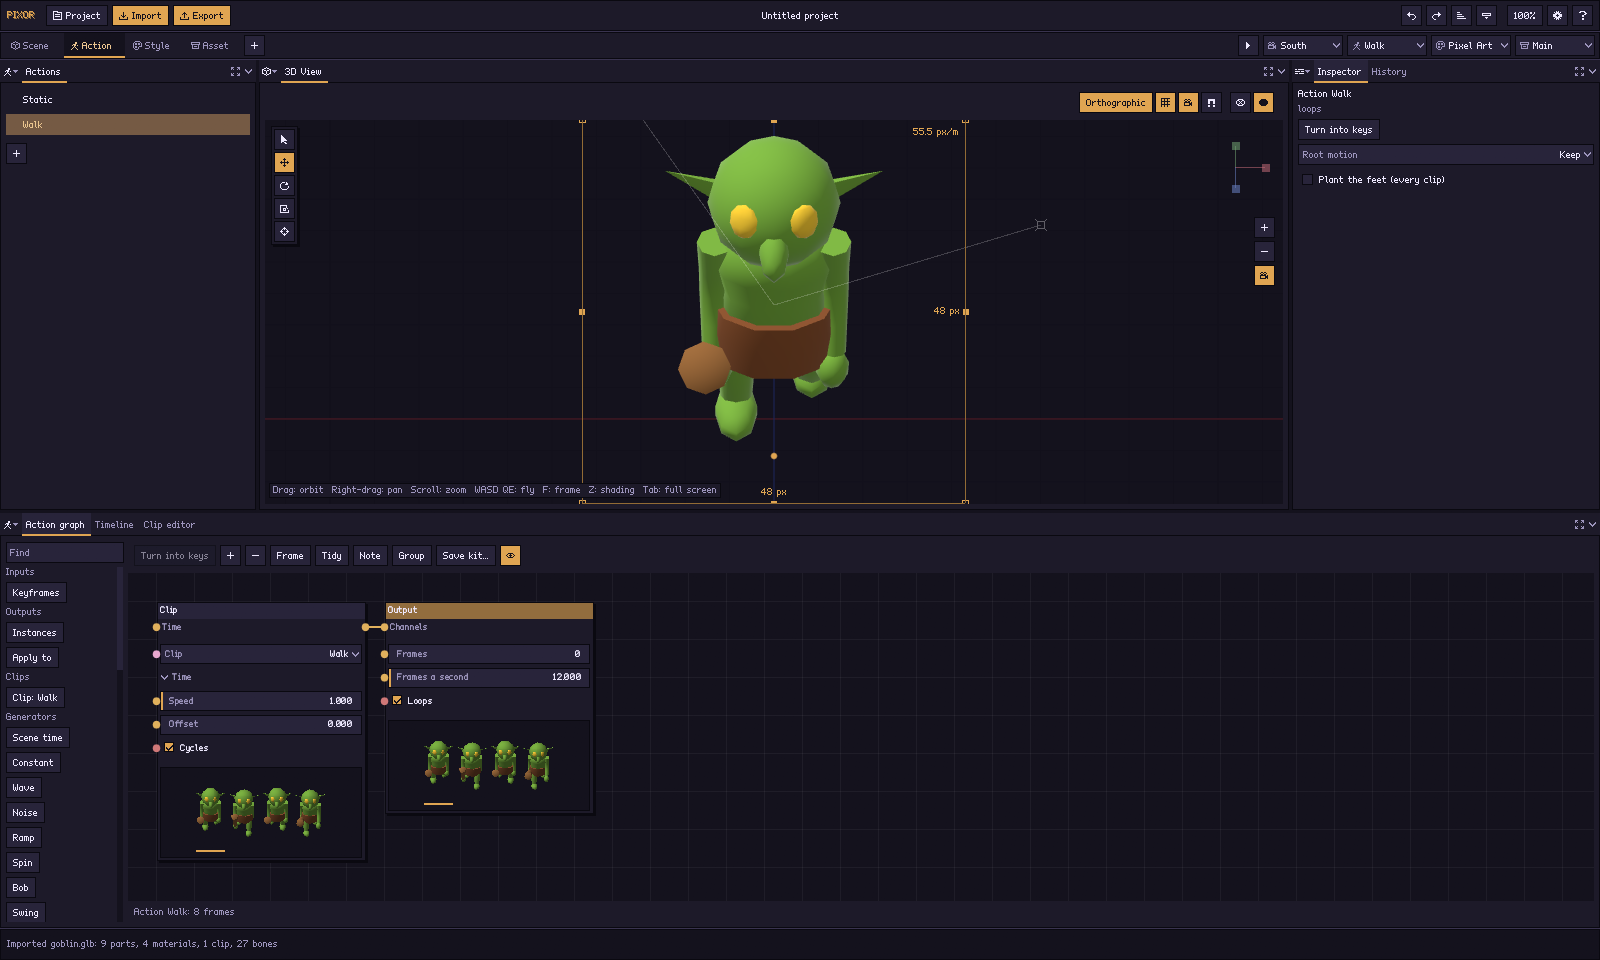
- Clips are the model’s own, one each (with its speed, offset and whether it cycles, or a time wired in); Inputs bring in Keyframes set by hand, a Routine of the project’s and an Action (below).
- Generators make channels: Scene time, a Constant, a Wave (sine, square, triangle, saw), Noise, a Ramp, and the motions Spin, Bob, Swing, Pulse and Slide.
- Filters change them: Maths, Blend (from one motion to another by a factor, or one added on another), Merge, Sequence, Time shift, Speed, Trim, Repeat, Reverse, Lag (smoothed), Step (held on twos, threes), Limit, Rename and Select. A filter added with a node chosen goes after it.
- Outputs: Apply to gives the channels that belong to nothing yet to a thing of the scene, by name — a part, a shape, a picture, a bone, a camera, the light, a material, a volume — added on top of where it stands, or set. A motion added while a thing is chosen in the Outliner goes to it. Instances is the other output.
- Values are plain numbers, words and switches (Number value, On/Off, Angle, Words) and the sums between them (Add, Subtract, Multiply, Divide values, Smaller value), to wire into any property.
- A number is a channel: anything wired into a property gives it its first channel’s value at that moment. Scene time × 0.5 wired into a Clip’s time plays it at half speed; a Wave into a Blend’s factor goes back and forth between two clips.
Each node shows what it does. A Clip, Keyframes, a Routine or an Action shows the model at four moments of what it plays; a Spin, a Bob, a Wave shows the curve of the number it changes; a filter or the Output shows whichever of the two fits what it hands on — a walk merged with a spin is four poses turning round, a Step on a Spin is stairs. A node that moves nothing says No motion. See node pictures.
Copies are instances. Every copy the Scene graph makes — a ring of
knights, a scattered field — is an instance: the Instances node plays
a motion on every one, each later than the one before by its Offset and
a random Jitter, so a crowd does not move as one; Apply to can give a
motion to one copy alone (copy 3). Morph targets a clip moves are
channels too, and so is colour cycling.
Routines are channels made once and played inside any action: New routine (the + under the Actions list) makes one and opens it; its channels belong to nothing, so a Routine node in an action, through Apply to, plays the same bounce on a coin and on a lamp. A routine is never exported by itself. Open routine shows the chosen Routine node’s network; Back returns to the action. An Action node plays another action inside this one — a scene’s whole motion as part of a bigger one — and Open action shows it. Which action the Style and Asset graphs draw is the Action select over them; each Sprites node of the Asset graph names its own.
New action starts an empty action, Keyed action one with keys of its
own, and Turntable, Light sweep, Colour cycle, Spin, Bob,
Swing, Pulse, Squash and Flicker start one with that node in it,
made exactly as --motion makes it, on the thing chosen (Flicker on the
light).
Things are moved by name, so an action plays on any scene whose things
have the same names. To animate by hand, move a thing in the 3D view (or
press I to key it): the action is given a Keyframes node the first
time, its keys go through a spline unless told otherwise, and they are
changed in the Clip editor, the tab beside the timeline: the chosen Clip or
Keyframes node’s channels, by the thing each moves (a header a click
folds), as a dope sheet of keys; a clip the model came with is shown as
the file has it, and Turn into keys (morph weights too) makes it keys
to change — Curves shows the curves of the chosen
channel’s thing, x in red, y in green, z in blue, its keys dragged up and
down there; the chosen key shows its two handles, dragged to set how
steeply the curve arrives and leaves (together, or apart with Shift). Turn into keys makes a Clip node
keys of the project’s own, to change key by key. Whether an action goes in
the sheets, and which frames of it become sprites, is the Asset step’s
question, answered by the asset graph’s Sprites nodes: each takes the
actions its Action names — Every one except Static until told.
- Frames (Asset step, a Sprites node chosen): every Sprites node starts
cutting at 12 frames per second (Frames/s). Click
the key strip of the Timeline (behind the Asset graph) to add or remove
frames by hand (Picked frames), or drag a key along it; each frame is held until the next
one. Smart frames keeps half the frames,
chosen as an animator would: the poses where the motion turns, with more
frames where the motion is fast; set how many under Kept frames
(
--smart-frames Non the command line). Use frames/s goes back to an even step. - Root motion (Action step; clips that move their root bone): Keep lets it travel; In place pins the root where the clip starts; In place, keep sway removes only the forward travel. The JSON export records the removed offset per frame.
- Plant the feet (every clip), for a humanoid: a frame where the soles
are close to the ground — the lowest they go in that clip — puts them
exactly on it, so a walk’s feet land on the same pixel row every frame
instead of the sprite bobbing by a hovering pixel. Frames in the air are
left alone.
--foot-planton the command line. - + under the list adds actions: clips from a file, library clips
(Library clip: walk and the rest — idle, walk, run, jump, attack, hit,
death, made by Pixor for any humanoid skeleton and fitted to yours, and
offered only when they fit;
lib:walkon the command line — forearms turn through them, the wrist snaps through the attack, and the attack strikes with whichever hand holds a prop), a turntable, a light sweep, a colour cycle and motion loops for still models: Spin, Bob, Swing, Pulse, Squash and Flicker. A colour cycle turns the shades of chosen materials round, like palette cycling; which materials is ticked per material in the Style step (shades cycle). On the command line,--motion spinand the rest, andpxr project set game.pixor --colour-cycle 8.
In the Outliner, a bone can hold a prop (Attach a prop here…: a sword, a shield, a torch) or swing with the motion (Swings with the motion: hair, capes, tails; Stiffness, Damping and Gravity shape the swing, simulated the same way every time).
Framing aids (the diamond button over the sprite) check that the sprite fits your game: a square, 2:1 isometric or hex tile grid at the feet, a background picture behind the sprite, and a reference sprite beside it. 2D lighting preview (L) lights the sprite from the pointer the way a game engine lights it with its normal map; Light as: the light kit lights it instead as the light kit shaders will in your engine, every pixel on a step of its own ramp.
A whole folder at once. Drop a folder of models on the window — an
asset pack you bought — and the Batch window lists what is in it and
renders every model into a folder beside it (Another folder for the
sprites… to choose), with the look of the open project if it is saved,
or a preset. At the end it says how many rendered and, for any that did
not, why; Show the sprites opens the folder. It is pxr batch without
the terminal, and writes the same report.json.
Your model changes, Pixor follows. When the model file changes on disk, Pixor reloads it within a second and renders again, keeping every setting and your undo history.
4. Choose the look
The Style step starts from a preset:
| Preset | Look |
|---|---|
| clean | dark silhouette, darker inner lines, three light bands |
| selout | coloured outlines taken from each colour’s own ramp, specular highlights, stronger hue shift |
| retro4 | four greens, like an old handheld |
| flat | no lighting, base colours only |
| wireframe | the mesh’s own edges as pixel lines over a flat silhouette, the hidden ones dotted |
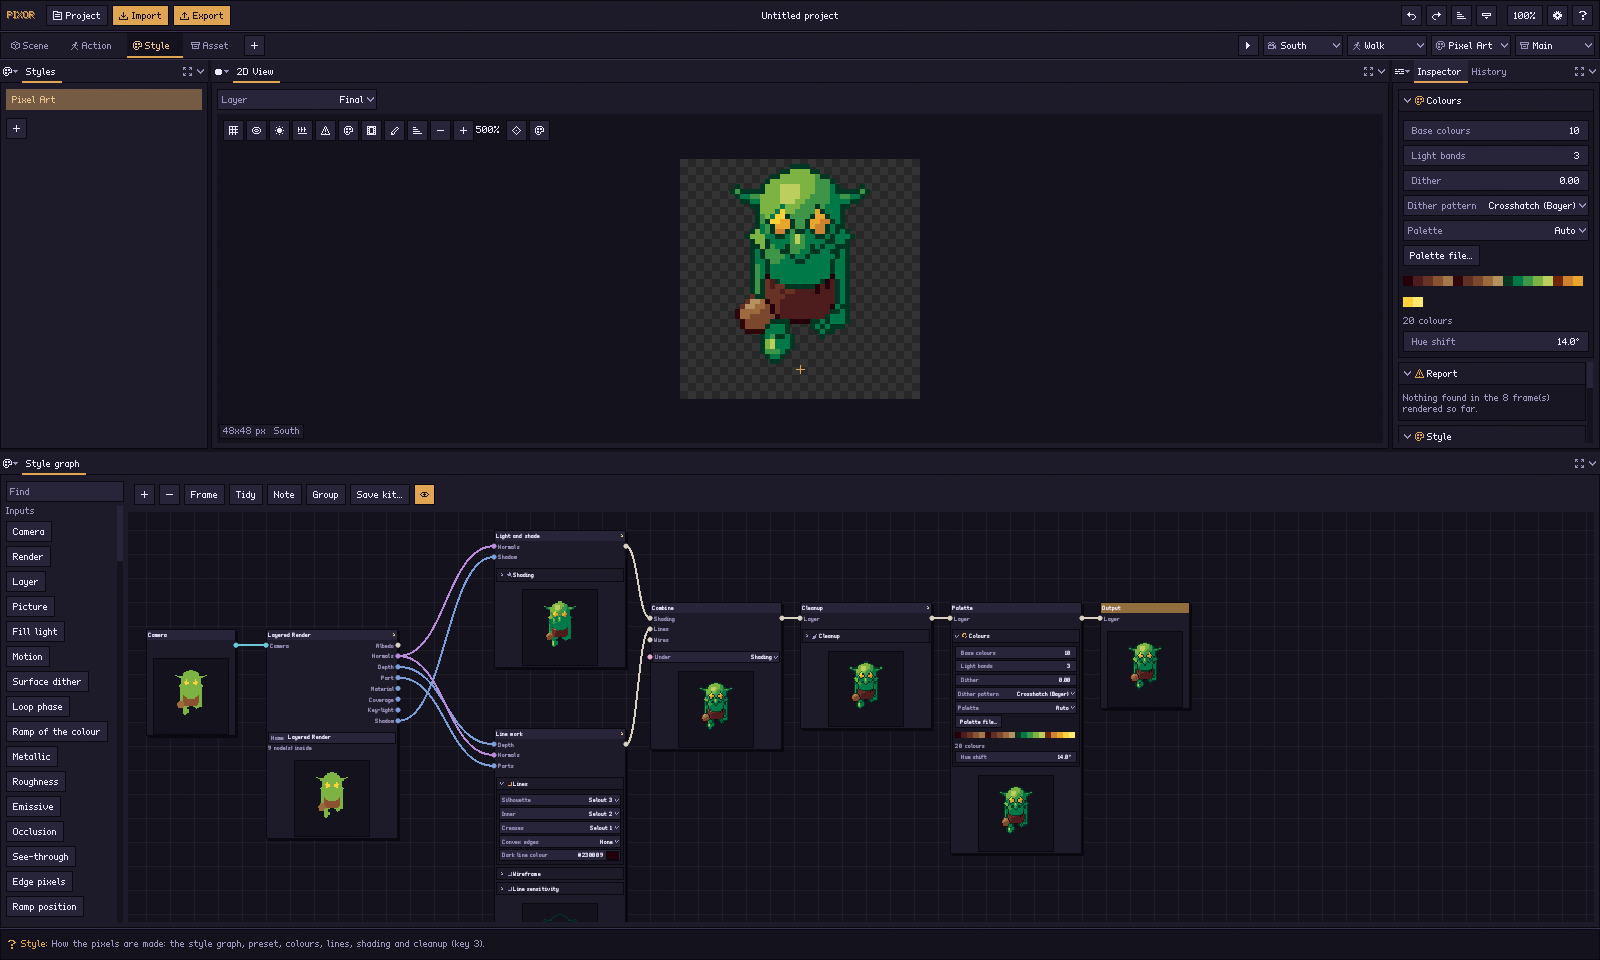
Then adjust what you like. An accent bar on the left edge of a setting shows
that it differs from the preset; right-click it to reset. Number fields
change when you drag across them (Shift for fine steps, Ctrl to snap),
step when you click the arrows at their ends, and take a typed value or a
sum like 64*2 when you click them.
Lines too busy, or missing? Open Line sensitivity: while you drag the crease angle or the depth step, the viewport shows which pixels become lines. Every step of the pipeline is a node of the Style graph: choose one and the 2D View shows what it makes, and the status bar explains the pixel under the pointer. See Settings for every setting.
5. Export
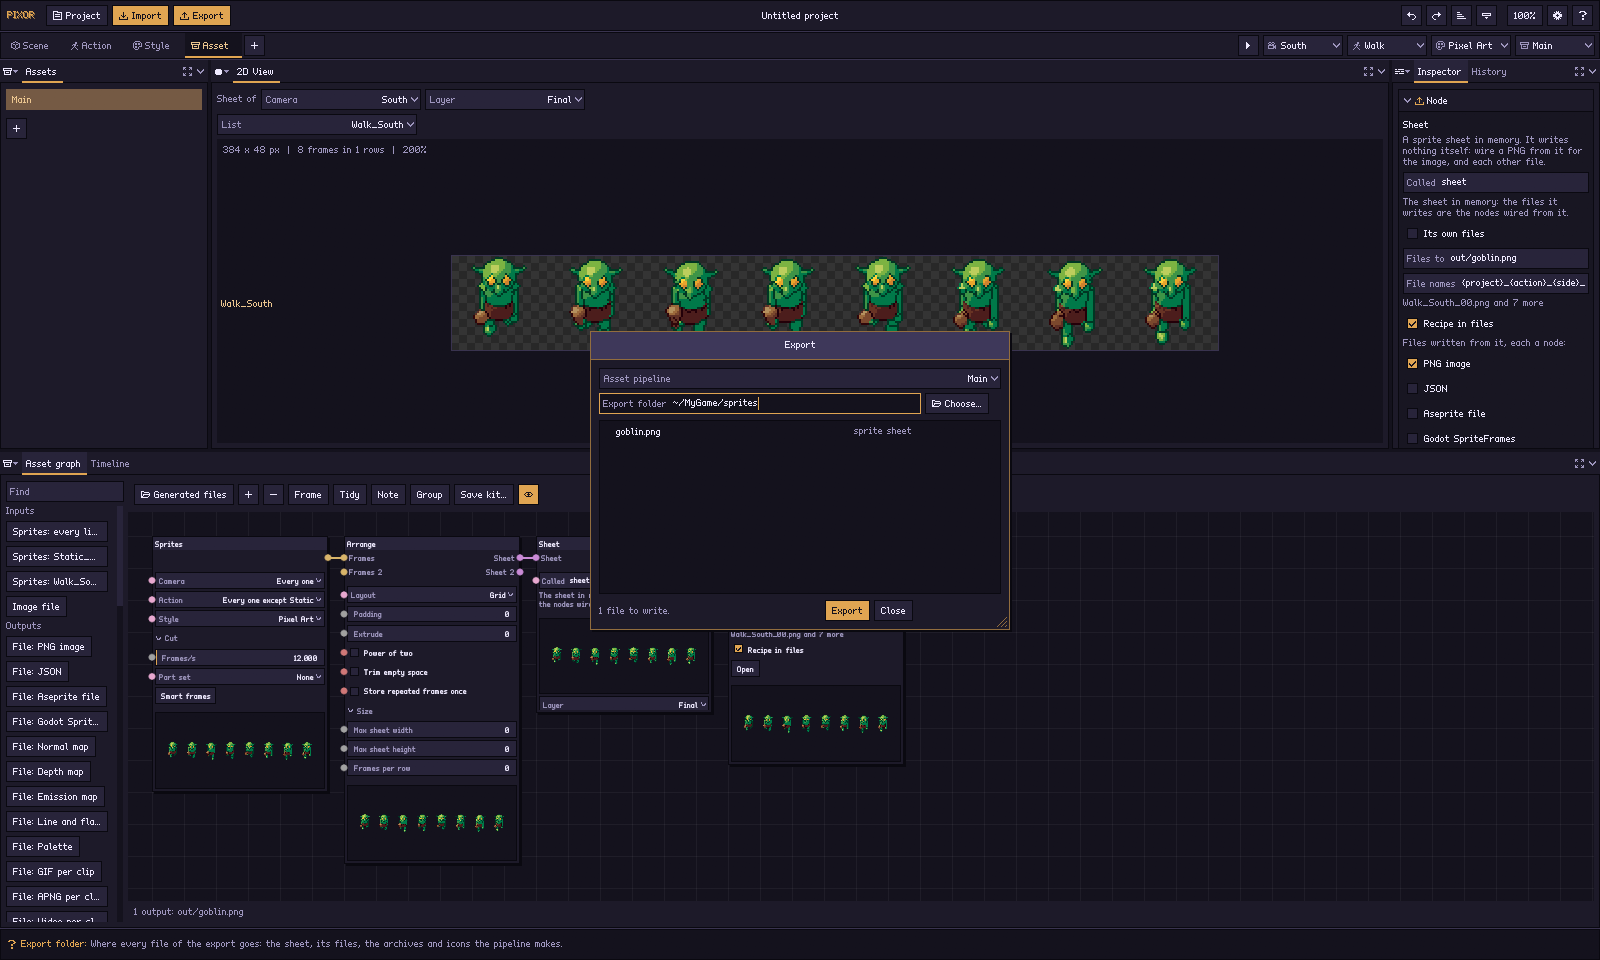
The Asset step is where you design the export. Its 2D View shows what
the chosen node of the asset graph makes — the whole sheet as it will be
written, row per action and side; drag a row to move that action in the
sheet. The Assets list down the left holds the project’s Asset
pipelines (a new project has one, Main). Under the view is the
asset graph: a Sprites node naming the cameras, actions,
Style and part set it takes and how the actions are cut, an Arrange,
and a Sheet. Every file is a File node wired from the sheet — the
PNG first, then JSON, .aseprite, normal map, Godot .tres, palette, GIF,
APNG, video and the rest — each with its own settings and an Open
button. A file that is quick to make shows itself on its node as you
work; a slow one (a GIF, a video, an archive…) has Generate.
The Export window is where you run it. Export (Ctrl+E), right after Import in the header, opens it: choose the Asset pipeline (the header’s, to start with) and the folder, and press Export now. Every file appears in the list with a loader until it is written, then its size, Open and Show folder. It exports the project as it is: nothing is saved, and a new project needs no saving first. The folder is kept with the project, so the next export is Ctrl+E and Enter. See the Export window.
Keyboard
| Key | Action |
|---|---|
| 1 to 4 | Scene, Action, Style, Asset |
| Tab | the panel under the pointer in full screen, and back (or the button at the right of any panel’s header) |
| Z | wireframe, solid, rendered |
| C (over the 3D View) | look through the camera, or back to the free view |
| F | frame the model |
| W A S D, Q E | fly (over the 3D scene) |
| P | perspective or orthographic |
| Space | play / pause at the real frame holds |
| Left / Right | previous / next frame |
| Up / Down | previous / next side |
| Shift+G | pixel grid (ground grid in 3D) |
| O | onion skin (the frames before and after) |
| L | 2D lighting preview |
| B | consistency board: every side at once |
| C (over the 2D View) | the colours this frame uses, counted |
| D (over the 2D View) | what changed since the frame before |
| A (over the 2D View) | hold this render, then flick between it and the new one (the strip icon beside it shows the two side by side instead: A held on the left, B now on the right) |
| Ctrl+Z / Ctrl+Shift+Z (or Ctrl+Y) | undo / redo |
| Ctrl+S | save the project |
| Ctrl+E | export the chosen asset |
| Ctrl++ / Ctrl+- | bigger / smaller UI |
| Ctrl+0 | UI size picked for your screen |
| Ctrl+N / Ctrl+O / Ctrl+I | new project / open project / import |
| Ctrl+Q | quit (asks first about unsaved changes) |
| Ctrl+, | preferences |
| F1 | the list of shortcuts |
Over the 3D scene the keys are Blender’s:
| Key | Action |
|---|---|
| G, R, S | move, rotate or scale what is selected; the pointer carries it |
| then X, Y, Z | lock it to one axis (with Shift: leave that axis out) |
| then digits | an exact amount, in metres, degrees or times |
| Enter, or a click | keep it |
| Escape, or a right-click | put it back exactly as it was |
| Shift+D | duplicate |
| I / Alt+I | key the transform in the action shown / delete its key |
| X or Delete | delete it (it asks first; Ctrl+Z puts it back) |
| Alt+A | deselect |
| Ctrl+click, Shift+click | choose as well, here and in the Outliner (Shift there: every row between); the Inspector then sets them all at once |
| . | frame what is selected |
| Home | frame everything |
| 1, 3, 7 | front, side, top, with Emulate numpad on (Ctrl: the other side) |
| 5 | perspective or orthographic, with Emulate numpad on |
Emulate numpad is in Preferences. Blender puts those views on the numpad, and Pixor cannot tell a numpad key from a number-row key — the window system reports them as the same key — so the preference is what turns the number row over while the pointer is in the 3D scene. With it on, Ctrl and a digit still picks one of the four steps.
Make it comfortable
If the interface is too small or too big, press Ctrl++ or Ctrl+-, or click the percentage at the top right. The gear icon opens Preferences:
- UI size: a slider from 100 % to 400 % in steps of five, applied when you let go. Fit this screen follows your screen’s scaling. Ctrl++ and Ctrl+- step it a tenth at a time.
- Text: smaller or larger text and controls at the same UI size. The pixel font grows in whole steps so it always stays sharp.
- Spacing: Compact, Comfortable or Roomy controls.
- Theme: Dusk (deep blue-violet), Charcoal (neutral grey), Ember (warm brown, for working at night), Paper (warm off-white, the one to use in daylight) or High contrast.
- Style: Pixel draws the controls as pixel art — one-pixel borders, hard corners and the pixel font. Soft draws them the way a 3D app does: hairline borders, slightly rounded corners and a smooth font, beside the icons drawn as smooth lines to match. Both hold every theme.
- Accent: pick one of the swatches or any colour with the colour picker (Custom accent). Each theme fits it to its own background, so one accent works on the light theme and the dark ones.
- Preview background: a checkerboard, or a colour such as your game’s background. The palette button above the preview changes it too.
- Emulate numpad and Warn of too fine a model: see above.
- Renderer: Draw sprites on the CPU uses Pixor’s own rasterizer
instead of the graphics card (
--backend cpuon the command line).