The Style graph
Every setting in the Style step is a knob on a pass: the shading, the lines, the mesh edges, the cleanup, the colours the sheet comes out in. The Style step is that graph: the passes as boxes with wires between them, each showing the picture it makes and carrying its own settings, so you see the processing and not only its result. You can put the passes in a different order, send one through a mask, or mix two together.
The chain of pictures from the model’s colours to the finished sheet is the explanation of the pipeline. The eye button turns them off on a slow machine.
You do not have to work in the canvas: choosing a node shows the same settings in the Inspector on the right, so a slider is always within reach. With no node chosen, the Inspector shows the Palette node, which carries the colours.
Styles. A project has as many Styles as it likes, each under its name with a style graph of its own, none of them a camera’s. The one on the canvas is the one chosen in the Styles list or the window header’s Style select, drawing the header’s camera and action. New Style under the list makes a copy of the one shown, named after it (Pixel Art 2). A row’s right-click menu renames it, Duplicates it, deletes it (Delete NAME…, which asks first: the first too, while another is left), Save kit… (Save the Style as a kit) writes it as a kit, its graph and its palette inside, and Use kit… (Use a Style kit) makes one saved from another project this one’s. Drag a row up or down to reorder the list. Saved in the library of pipelines, they are listed in the node library under My pipelines; the project’s own are under Pipelines, beside the Pixelate node.
Every graph has its node library down its own left, when its panel is wide enough: the Scene, Action, Style and Asset graphs alike. It lists everything the graph can hold, the inputs and the outputs first, then the rest by group, with a line on what each one does; type in Find to narrow it. Click one to add it where the graph puts it, wired up — or drag it onto the canvas to put it where you let go.
A project that never changes a node still stores no graph at all and renders exactly as it did before.
The graph you start with
It is Pixor’s own pipeline, wired up:
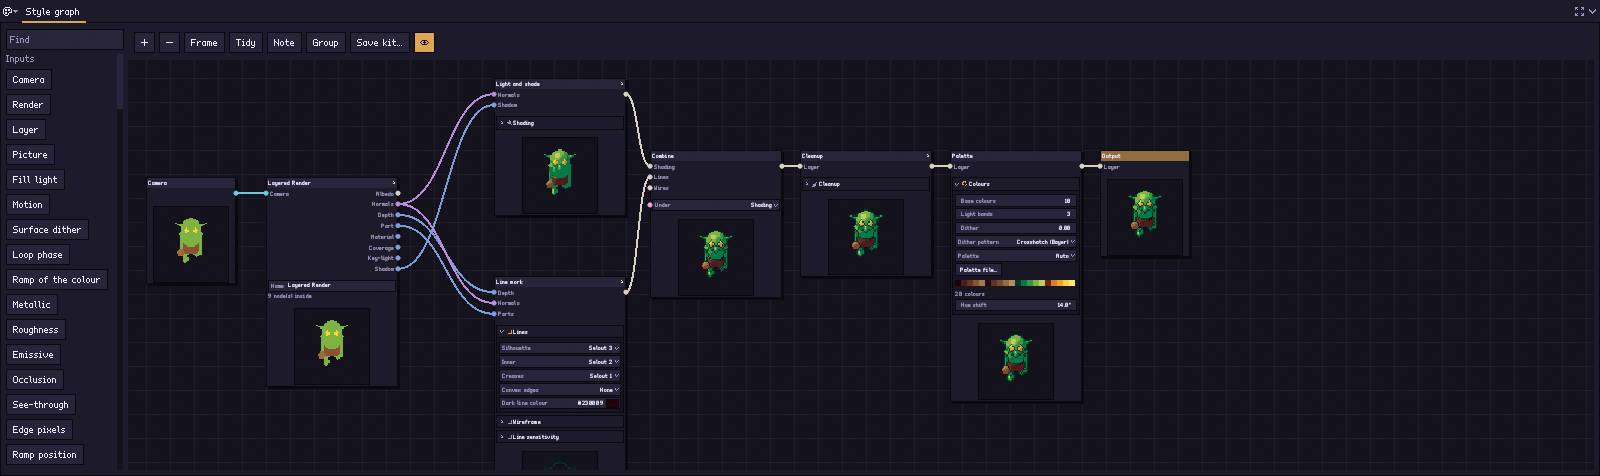
Left to right in the order the work happens, so wires run forward and cross as little as they can.
-
Camera is where the graph starts: the camera this Style draws for. Every camera that points at the Style runs the graph once, from its own side.
-
Layered Render takes the camera: what it rendered of the action at this frame, before any pixel-art step, with each of its eight layers on an output of its own — albedo, normals, depth, part, material, coverage, key light, shadow. The shading reads normals and shadow, the lines depth, normals and part. It is a group of atoms: open it and it is the frame of a Render node (one layered frame) and eight Layer nodes, each taking the layer chosen on it out of the frame. The wires show what reads what, and they are real: wire a Noise field into Light and shade’s shadow and the shadow is that noise; unwired, a pass reads the camera’s render itself.
-
Palette is where the frame’s colours are chosen: how many base colours and light bands, the dither, a palette of its own, the hue shift. Output carries nothing: it is the frame.
-
Light and shade turns the light into a step on each pixel’s colour ramp. It is a group of atoms you have too, in order: Light bands (the band of the key light each pixel falls in, dithered at the edges, held across frames near an edge), World light (lamps, wave lines, cloud shadows, light shafts, shore foam), Highlights, Glow, Ramp shifts (and the colour cycle), then Shading colours, which turns the shading into colours. The wire between them carries a shading: each pixel’s ramp and its step on it.
-
Line work finds the silhouette, the inner lines and the creases. It is a group too: Silhouette, Edges (inner lines, creases, convex folds), Tidy lines (short fragments dropped, corners and doubles removed) and Line colours, with a lines wire between them.
A group’s parameters are the settings of the atoms inside it. On the
node, or from a script, setting one sets it on every atom inside that
carries it — pxr graph set my.pixor --node light-and-shade --set dither=0.5,
--node line-work --set min_inner_line=3 — so a group you build yourself from
atoms is set the way the shipped ones are. Double-click a group (off its
title), or press the arrow on its title, to open it and see, or rewire,
what it is made of.
- Wireframe appears too when the wireframe look is on, and goes into the third input of Combine. It is a group of two atoms: Wire paths (where the mesh’s edges cross the frame, and whether one behind the surface is left out, dotted or darker), then Wire colours.
- Combine lays them over each other, decides what is under the wires, and thins the lines against each other.
- Cleanup removes stray pixels and softens line corners. It is a group of two atoms: Stray pixels (runs of one colour too small to keep, and how many passes look for them), then Smooth corners (which corners of the lines soften a step down the ramp).
- Output is what the graph makes: this camera’s sprite at this moment of the action, what the Asset graph’s Sprites nodes then cut into sprite lists. It carries no settings; the colours are on the Palette before it.
Those nodes call the very same code the pipeline does, so the graph you start with makes exactly the pixels you had before. Pixor’s own golden tests are rendered both ways and compared, every time.
Working in it
Every graph works one way — the Scene, Action, Style and Asset graphs alike: the same bar, the same right-click menu, the same keys and gestures. This table is all of them, in all four. Each edit is one step of the history (Ctrl+Z takes it back), moving a node included; the keys work while the pointer is over the graph.
| Do | To |
|---|---|
| Drag with the middle button (or Alt and the left) | move the view |
| Scroll (or pinch) | zoom about the pointer, from a quarter size to double, a notch the same step as in the 3D View and the 2D View; Frame and a graph’s first sight fit it |
| Frame, or Home | bring every node on screen |
| Click a node’s title | choose it: its settings appear in the Inspector as well, and the middle shows what it makes; where nodes lie over each other, the one on top |
| Shift-click a node | pick it as well, or let it go |
| Drag the background | a box: every node it touches is picked (Shift keeps those picked already) |
| Drag a node | move it, and every node picked with it |
| +, or right-click the canvas › Add a node | the node library’s list, by group: what is chosen goes in; from the right-click, where you clicked. Use kit… (Add a kit as a group) at its top puts a kit in as one group |
| A row of the library down the left | click it to add it where the graph puts it, wired up; drag it onto the canvas to put it where you let go |
| Drag from the round dot on a node’s right to a dot on another’s left | wire them; while you drag, every dot the wire fits is ringed |
| Let a wire go over empty canvas | a menu of the nodes it fits: type to narrow it, Enter takes the first |
| Drag an input dot away | unwire it; let go on another input to move the wire there |
| Click a wire, then Delete | cut it; the wire under the pointer (or the chosen one) also shows an × at its middle that cuts it in one click |
| F2, or a double-click on a node’s title | rename it: its own name on its title (a group’s is its name); empty, it is called what it is again |
| Ctrl+D | duplicate the chosen nodes, below them, wired as they are and reading what they read |
| Ctrl+C, Ctrl+V | copy the chosen nodes, and paste them under the pointer — into any graph of the same kind: another Style, another action, another Asset pipeline, the inside of a group. Nodes of one kind of graph do not go into another, and the status line says so |
| − (Delete the chosen node), or Delete | delete the chosen node; what read it reads what it read, so a chain stays a chain |
| Group, or Ctrl+G | the nodes picked (and the chosen one) become one group, open |
| The arrow at the right of a group’s title, or a double-click on the group off its title | open it in place, or fold it back |
| Save kit… | the chosen group as a kit, or — no group chosen — the whole graph (the dialog’s title says which) |
| Tidy | lay every node out again, left to right in the order the work happens |
| Note | put a note round the chosen node, or in view |
| The eye, or right-click › Node pictures | show or hide the picture each node makes |
| Right-click the canvas | all of the above, with their keys, and what one graph has of its own: the Style graph’s Show only what a preset sets, Show every node’s settings and Back to the preset’s graph; the Scene graph’s Back to one copy; the Asset graph’s Back to one sheet |
What a node’s picture is, graph by graph: in the Style graph the pixels it makes; in the Scene graph the objects it hands on, seen from above; in the Action graph what the node’s output does over one go of it (below); in the Asset graph the frames a list hands on, or the sheet or the file it writes.
In the Action graph, each kind of node has the picture that says the most about it:
| Node | Its picture |
|---|---|
| Clip, Keyframes, Routine, Action | the model at four evenly spaced moments of what it plays, left to right — a loop over one cycle, the last moment just before it starts again — all seen through one camera that holds every pose, from the shown camera’s angle |
| Spin, Bob, Swing, Pulse, Slide, Wave, Noise, Ramp, Scene time | a curve of each number it really changes, from its lowest to its highest: a Spin a ramp, a Bob a wave; numbers that change alike are one line (a Pulse’s three sizes) |
| Filters, Apply to, Output, groups | as what they hand on: the poses when that moves more than three numbers (a clip, a clip merged with a spin, held on twos), a curve when it is one motion (a Step on a Spin draws its stairs) |
Curves are coloured by kind — places blue, turns amber, sizes green, anything else pink — at most six of them, the ones that go furthest; with the pointer over the picture it names each line and says how many more there are. Poses fall back to curves when what moves is no part of the model (a camera, the light). A node that changes nothing — a Constant, a clip that is not there — says No motion where its picture would be. A line across a curve, or a bar under a pose, follows the time on the Timeline as it plays.
The pictures are drawn by Pixor’s own CPU rasterizer, small, on a thread of their own, the chosen node’s first: the graph never waits for them. A node keeps the picture it had until its next one is ready, so nothing blinks; an edit that does not change what a node hands on does not draw it again. A node takes about 25 ms with the knight and 40 ms with the humanoid FBX fixture, so twenty nodes are all drawn within a second of an edit.
Notes are boxes behind the nodes with your own words along their top: what this part of the graph is for, what to try next. Type straight into one. The grip at its top-left moves it and every node inside it, so a note is how a part of a large graph is kept together as well as how it is explained; the corner at its bottom-right sizes it, and the minus takes it away (the nodes stay). A note changes no pixel.
While a slider in a node is being dragged, that node’s picture is made again first, then the chosen node’s, then the rest in order — so the change shows where you are looking at once.
Each kind of wire has its own colour, so what fits where is visible without reading: a layer of palette colours, a mask, a number per pixel, a normal, a ramp, a palette, a camera, a render, a shading, lines, wire paths, and the values (on/off, number, words). An input that has nothing on it and needs something is ringed in red, and the line along the bottom says what is wrong. A wire of the wrong kind, and one that would take the graph round in a circle, are refused when you let go.
What the nodes are
The library and the Add a node menu list them under these groups:
| Group | Nodes |
|---|---|
| Inputs | Camera, Render, Layer (albedo, normals, depth, part ID, material ID, coverage, key light or shadow of a render), Picture, Fill light, Motion, Surface dither, Loop phase, Ramp of the colour, Ramp position, the material channels Metallic, Roughness, Emissive, Occlusion, See-through, and Edge pixels (where the mesh’s own edges cross the frame in front of everything) |
| Passes | Shading, Lines, Mesh edges, Combine, Cleanup, To palette — each a whole pass in one box |
| Shading | Light bands, World light, Highlights, Glow, Ramp shifts, Shading colours, and the hand-drawn finish: Shapes, Unband, Glint, Soften bands, Hatch |
| Lines | Silhouette, Edges, Tidy lines, Line colours, Colour edges, Line weight |
| Wireframe | Wire paths, Wire colours |
| Cleanup | Stray pixels, Smooth corners, Tidy silhouette |
| Colour | Palette, Nearest colour (every pixel in the palette colour nearest its own, ramps aside), Step the ramp, Step where masked, Flatten, Palette dither, Ramp map, Tile colours, Sub-pixel motion |
| Masks | Threshold, By part, By material, By facing, Noise, Pattern, Solid pixels, Not, And, Or |
| Mix | Choose by mask, Dither mix, Layer over |
| Maths | Number, Add, Subtract, Multiply, Divide, Smaller, Larger, Without sign, Fraction, Whole number, Hold between, Remap, Mix, Step at, Smooth step, Agreement, Length, As a number, Noise field (the noise the Noise mask thresholds, as a number) |
| Space | Offset, Blur, Slope, Grow, Shrink, Cavity — each says how far around a pixel it looks, which is what keeps tile seams exact |
| Values | see Every property is an input |
| Groups | In and Out, the ports inside a group |
| Outputs | Output, CRT (a picture to look at, never a sprite) |
Above them the library lists Pipelines (the project’s Styles, and Pixelate), My pipelines and My nodes.
A picture is a layer of your own: a paper grain, a pattern, a painted sky or a logo, each pixel the palette’s colour nearest the picture’s, on the sprite’s own pixels from where it is put, or tiled over the whole frame. Choose by mask lays it where you want it, Layer over puts it on top. The picture is read once and kept in the node, so a saved look or a kit carries it. From a script:
pxr graph add my.pixor --node picture --set file=logo.png --set tile=false   # node 8 on a new project
pxr graph add my.pixor --node layer-over --in under=4 --in over=8             # node 9: the logo over the palette's frame
pxr graph wire my.pixor --from 9 --to 5 --slot layer                          # into the Output
Mixing never makes a new colour. Pixor works in palette-index space, so a mix picks one pixel or the other; it never blends two into a third that is not on the palette. Dither mix lays A and B in an ordered pattern, which is how a pixel artist blends.
A hand-drawn finish
Some nodes do what a pixel artist does by hand after the shading is there. None is in the graph you start with; add the ones you want. Those on a shading go between Ramp shifts and Shading colours (open the Light and shade group), in the order below; those on lines between Edges and Line colours (open Line work). Every pattern they lay down sits on the surface, so it moves with the model instead of crawling over it, and nothing they make is off the palette — except CRT, on purpose. Those that decide by what is round a pixel or where it is on the surface (Shapes, Glint, Hatch, Unband) keep, where the surface did not move since the frame before, what they decided then, so they add no flicker; a looped clip through a graph with one goes round once first, so its first frame follows its last.
| Node | Wire it | What it does | Settings |
|---|---|---|---|
| Shapes | shading → shading | Light and shadow shapes cleaned like drawn ones: a shape of one band smaller than Smallest takes the band most of what is round it is in, then each pixel takes the band most pixels within Smooth of it are in, which takes tongues that wide and smooths borders. Only pixels of one part and one ramp count for each other, and a band needs most of what is round a pixel, so a spot of a colour of its own is left to Stray pixels. A pixel whose surface did not move and whose light is the same keeps the band it was given the frame before. | Smallest, Smooth |
| Unband | shading (+ lines) → shading | A band edge that runs along the silhouette, a part’s edge or a line, at one distance from it — the pillowed look — is staggered by a pixel in runs, as a hand steps it: at one half, two pixels of every four along it, counted on the surface so the steps move with it. | Within (pixels from the edge), How much |
| Glint | shading (+ mask, + light) → shading | One deliberate highlight on each part (the render’s part, wherever it is in the frame) where the mask is set, at its brightest pixel in the top band, held where it was the frame before when two are as bright; Per part asks for more, each at least Apart from the others. Unwired, the light is the key light. | Size (1 or 2), Per part, Apart, Only the glint (other highlights there go down to the top band) |
| Soften bands | shading → shading | The corners of the staircase between two bands softened: between bands that jump two steps or more (cast shadows, lamps, highlights) the corner takes the step between; between bands next to each other, with Dither, the corners on one colour of a checker laid on the surface take the other band — a dithered in-between, on the palette, which the cleanup leaves alone. | Both sides, Dither |
| Hatch | shading → layer | The shading’s colours, with diagonal lines, cross-hatching or dots over each band below the top one, denser the darker the band, in the step below or in the line colour. A hatched band is a pattern as a dither zone is: the cleanup leaves the pixels between its strokes alone. It takes the place of Shading colours. | Pattern, In line colour |
| Cavity | (normals, depth) → number | How much the surface folds inward: above 0 in a crease, below 0 on a ridge. Threshold it and wire it into Step where masked by −1 for creases a step darker. Unwired, it reads the render. | Radius, Depth jump |
| Colour edges | (lines, albedo) → lines | A line where the painted colour changes inside one part, on the darker side so it is one pixel wide, coloured as the creases are (so give Line colours a crease colour). Put it before Tidy lines, which keeps its lines free of corners and doubles. Unwired, it reads the model’s own colours. | Contrast |
| Line weight | lines → lines | The silhouette two pixels thick on the side away from the light, and Border rings of outline round it, in the outer line’s colour or, with Own colour, in Colour (the palette’s nearest). Where an inner line meets the silhouette it stays one pixel. | Shadow side, Border, Own colour, Colour |
| Tidy silhouette | layer → layer | One-pixel spikes taken off the outline (not the end of a thin part), one-pixel notches and holes filled with the colour round them — not with the outline’s where that would make it two pixels thick. | Spikes, Notches |
| Palette dither | layer (+ light) → layer | Each pixel’s own surface colour, lit by the factor wired in (1 is as it is), as the pair of palette colours that mixes nearest it (Yliluoma’s dither), laid by the surface’s threshold. Lines stay; the rest is a dither the cleanup leaves alone. | Pair spread: higher keeps to close pairs |
| Ramp map | number (+ ramp) → layer | An artist’s ramp read from a picture strip: the number 0 to 1 picks along it, dark to light. A strip of several rows gives each ramp its own row. With no picture, the colour’s own bands. Wire Key light through Remap into it. | File |
| Tile colours | layer → layer | The frame in tiles from its top left, each held to so many colours, as the NES lays out 8 × 8 tiles of 3: the colours most used stay (a pixel three of its neighbours contradict counts as theirs, so a rasterizer’s edge pixel does not swing the choice), the rest take the nearest of them, and a pixel left alone in its colour takes its neighbours’ in the tile. | Tile, Colours |
| Sub-pixel motion | layer (+ motion) → layer | A part that moves by less than Still below pixels a frame (a breath, a sway) shows it in its edge pixels: one only partly covered goes a step down the ramp, and the empty pixel it is creeping into takes that colour once a quarter covered. Anywhere in the graph: the edge is the render’s, so after Combine it works too, the outline staying as it is (only the edge pixels inside it change). | Still below, Steps |
| CRT | layer → layer | Its picture is the frame on a screen — scanlines, a shadow mask or an LCD’s grid — a few screen pixels to a pixel. That picture is off the palette, so it is only for looking at and for stills: the layer goes on to the sprite unchanged, and no sheet or export ever carries the screen. Choose it and the 2D View shows the screen, first at whole steps; pxr stages MODEL --style KIT --node crt writes it as crt.still.png. Put it last, before Output. |
Screen, Size |
From a script, as any node:
pxr graph add my.pixor --node tidy-silhouette --in layer=3   # node 8, after Cleanup
pxr graph wire my.pixor --from 8 --to 4 --slot layer         # and into the palette
Glint and the other nodes that take a shading go inside Light and
shade, where the shading is (outside it the group gives a finished layer):
open the group in the app and add them there, or save the group as a kit,
edit it and put it back with pxr graph swap --kit.
Each has a golden case (tests/golden/cases.txt, hand-*): the graph the
look starts with and the node put in, as a Style graph kit pxr render --style reads.
Every property is an input
A node’s settings are its properties: rows inside the node, each with a port at its left. Set one on the node, or wire a value into it, and the row greys out and shows what the wire brings. The values are nodes of their own, under Values in the library: Number value, On/Off, Angle, Words, and the maths over them (Add values, Subtract values, Multiply values, Divide values, Smaller value, Larger value, Is above, Opposite, Both on, Either on, Pick a value), whose operands are properties too. One On/Off wired into three nodes turns all three on or off at once.
Properties come in named groups (a Remap’s From and To, the Edges’ Colours and Finding them); click a group’s name to fold it. A wire into a folded property arrives at its group’s name.
A group’s properties are its value inputs. Group nodes whose properties are fed by values, and each value becomes an input of the group, named after the property it goes into and listed after the group’s other inputs: a row on the group’s box, set there (which sets every property inside wired from it) or wired from outside.
The groups a Style’s sections set — Light and shade, Line work, Wireframe, Cleanup — are set by those sections as well as by the properties of the atoms inside them; the Palette is the frame’s colours, which the Colours section sets.
Once per material, once per part
A node runs once for the whole frame unless you say otherwise. Choose a node and set Runs in the Inspector to Once per material or Once per part, and it runs once for each of them, seeing only that one each time, as if the rest of the frame were empty; the pieces are put back together pixel by pixel. Its title then says each material or each part.
That is what keeps a blur, a grow, an outline or a cleanup from reaching across from one part into the next: a Lines node run per part draws a line round every part, where the same node run once draws one round the whole model. A group set this way runs everything inside it this way. A node run per part does not look at the frame before, so it has no flicker hysteresis.
The same setting from the command line, or in a look file, is the node’s
scope: pxr graph set my.pixor --which style --node cleanup --set scope=object
(frame, material or object).
A node’s picture as a layer of its own
The sprite is what the output node gets, but any node’s picture can be
written as well. Choose the node and type a name under Extra output in
the Inspector: its title then says layer and the name, and every export
carries it beside lines and flat — a sheet of its own named after
it with the layers export (hero_rim.png), and a hidden layer of the
.aseprite, which a re-bake replaces like Pixor’s other layers. A rim
light, a mask a shader reads, the lines of one part: whatever a node makes.
Clear the name and it is an output no more. It cannot take a name a sheet
has already (final, lines, flat, normal, depth, emission
and the like) or another extra output’s.
From a script: pxr graph extra my.pixor --node line-work --name rim, and
--drop to take it away.
An example: weathered paint
Flatten the shading, then choose between the shaded and the flat version with a noise mask, and the surface reads as paint worn off in patches:
 Light and shade --+---------------+
                   |               +--> Choose --> Combine --> ...
                   +--> Flatten ---+
Noise ----------------------------+- Add Flatten and wire Light and shade into it.
- Add Noise; set its size to about 5 pixels.
- Add Choose by mask: Light and shade into A, Flatten into B, Noise into the mask.
- Drag the wire out of Combine’s shading input, and wire Choose by mask in instead.
Groups: one box you can open
A group is a graph used as one node. Pixor ships Pixelate, the whole pipeline above in a single box (in the library under Pipelines), and the groups the graph you start with is made of: Layered Render, Light and shade, Line work, Wireframe and Cleanup — named apart from the Shading and Lines passes, which do in one box what the groups do in steps. None is a privileged built-in.
A group opens in place, in every graph. Double-click it off its title, or press the arrow at the right of its header (a group is the only node that has one): the group itself becomes the frame of the graph it is made of. A group inside an open group opens the same way, inside its frame. Its header runs across the top, its parameters stay down its left, and where its picture was, the nodes inside are laid out, in the same graph. Wires cross the frame only at its two sides. What feeds the group arrives at its inputs, on the left, and leaves from an anchor at the right of each, where the closed box’s border was, for the nodes inside that read it. Each output is an anchor on the frame’s right border, level with what makes it inside, and everything that reads that output is wired from there. Nothing inside ever leaves the frame, and the nodes after it move aside to make room — only on screen: the graph keeps where they were. Every node inside is edited like any other: its settings, its picture, its wires, its name; a node pasted or let go inside the frame goes into the group. The arrow again folds it back to a box and its picture. Which groups are open is the window’s, not the project’s.
Making a group of your own. Pick the nodes to put in it — drag a box round them, or Shift-click them; the chosen one counts too — then Group (or Ctrl+G): they become one box, with an input for each wire coming in and the result the rest of the graph read from them as its output. It opens at once; F2 names it. Save kit… on the bar keeps the chosen group as a kit of your own (Save the group as a kit; the file dialog starts in the folder the library lists under My nodes), and the library lists it there, in every project, in the graph of its kind; with no group chosen it keeps the whole graph (Save the Style graph as a kit). Every graph’s Save kit… means this.
A group travels as a kit like any other look, and
pxr graph flatten look.pixorkit writes it out as the plain nodes it stands
for, so it reads as a diff rather than as a black box.
A saved look is a group too. + › Use kit… puts one a
Style’s Save kit… or pxr graph save wrote into the
graph on screen as a single group: its Output
node becomes the box’s output, a layer, for you to wire in — over the
graph’s own result through Layer over, say, or into a Choose by mask, so
one part of the model gets another look. Double-click it to see and change
the look inside.
What you can build out of
Beside the passes, the library holds the small nodes a look is written from: the inputs, maths, space, masks, colour and mix nodes above.
The shipped groups — Light and shade, Line work, Wireframe and Cleanup — are made of atoms that each do one job with a few knobs: the light bands, an inner line’s minimum length, the model’s own edges, stray pixels found by how they join up. The whole passes they replace are still in the library for a graph that wants one box. You can still replace any of them with your own chain — wire Key light into Remap, Step at and To palette and you have written your own shading, or put Edge pixels as the mask of a Choose by mask between a flat look and one a step up, and you have drawn the wireframe yourself.
Sharing a look
A Style’s Save kit… and Use kit… carry a look from one project to another; the model, clips and exports stay as they are. A Style kit carries the graph too, so “every asset in my game matches” covers a wired look.
Right-click the canvas › Back to the preset’s graph throws the graph away and returns to Pixor’s pipeline. The project then stores no graph at all.
Every graph has the same bar: what it shows (a pipeline’s name, a routine’s way back), then + (add a node), − (delete the chosen one), Frame, Tidy, Note, Group, Save kit… and the eye that shows or hides the nodes’ pictures — every one of them working in every graph.
What it will not do
- No script nodes and no GPU nodes. Every node is a fixed function of its inputs, so the same project gives the same pixels every time, today and in ten years (on another machine almost always: see the FAQ).
- Nodes never change under you. A graph records which version of each node it was made against, and old behaviour stays in Pixor under its old version.
- Not a general image editor. These are Pixor’s own passes, typed so that only sensible things connect. Painting, filters and arbitrary maths belong in a paint program.
Node reference
Every node of the four graphs, with what it does, what it takes and gives, and each setting with its range and default.
Style graph
CameraRenderLayerPictureFill lightMotionSurface ditherLoop phaseRamp of the colourMetallicRoughnessEmissiveOcclusionSee-throughEdge pixelsShadingRamp positionLinesLight bandsWorld lightHighlightsGlowRamp shiftsShading coloursSilhouetteEdgesTidy linesStray pixelsWire pathsWire coloursSmooth cornersLine coloursMesh edgesCombineCleanupTo palettePaletteStep the rampStep where maskedFlattenThresholdBy partBy materialBy facingNoiseNoise fieldNearest colourPatternSolid pixelsNotAndOrChoose by maskDither mixLayer overPaintNumberAddSubtractMultiplyDivideSmallerLargerWithout signFractionWhole numberHold betweenRemapMixStep atSmooth stepAgreementLengthAs a numberOffsetBlurSlopeGrowShrinkShapesUnbandGlintSoften bandsHatchCavityColour edgesLine weightTidy silhouettePalette ditherRamp mapTile coloursSub-pixel motionCRTOutputNumber valueOn/OffAngleWordsAdd valuesSubtract valuesMultiply valuesDivide valuesSmaller valueLarger valueIs aboveOppositeBoth onEither onPick a valueLayered RenderLight and shadeLine work
Action graph
ClipKeyframesRoutineActionScene timeConstantWaveNoiseRampSpinBobSwingPulseSlideMathsBlendMergeSequenceTime shiftSpeedTrimRepeatReverseLagStepLimitRenameSelectInstancesApply toOutputNumber valueOn/OffAngleWordsAdd valuesSubtract valuesMultiply valuesDivide valuesSmaller valueLarger valueIs aboveOppositeBoth onEither onPick a value
Asset graph
SpritesImage fileMergeLayerFrame rangeHoldFlipTagArrangePlaceStackOverlaySheetFileJSONAseprite fileGodot SpriteFramesNormal mapDepth mapEmission mapLine and flat layersPaletteGIF per clipAPNG per clipVideo per clipLight kitPICO-8 cartReportShadow layerPalette variantsPaper-doll layersParallax layersText fileZIP archiveTile setIconsAnimation fileTile set JSONGodot TileSetTiled tilesetDual-grid sheetGameMaker autotilesRPG Maker autotilesUnity RuleTileLDtk projectTile palette variantsMap previewNumber valueOn/OffAngleWordsAdd valuesSubtract valuesMultiply valuesDivide valuesSmaller valueLarger valueIs aboveOppositeBoth onEither onPick a value
Scene graph
ImportObjectRingRowGridScatterLook atVaryPlayMergeSeen byDifferenceJoinMoveMirrorSubdivideDisplaceHeight fieldBevelDrop to groundOn surfaceOn pointsSet shapeAttributeSelectOutputShapePictureTextVolumeLampEffectItemPropSpringTerrainSprigsFoliageWaterCloudsSkyWindLight shaftsTimes of dayChunksNumber valueOn/OffAngleWordsAdd valuesSubtract valuesMultiply valuesDivide valuesSmaller valueLarger valueIs aboveOppositeBoth onEither onPick a value
What this page describes is in the full version; the free browser demo keeps to the default look and the PNG sheet.
Try in browser Get Pixor