The scene
Pixor shows your model as a scene: the model with its parts and skeleton, the cameras that make the sprite sheets, and the lights. You can walk around it in 3D, switch any view to pixel art, and look inside each stage of the pixel-art pipeline.
Four steps, and workspaces across the top
The four steps are the stages from a model to a finished sheet, left to right: Scene, Action, Style and Asset. Keys 1 to 4 (or Ctrl+1 to Ctrl+4) switch between them. Pixel art first appears in Style, and sprites exist only from Asset on: the motion is decided in 3D first.
Each step is a different job, and the Inspector on the right holds only that job’s settings:
| Step | What it is for | What the Inspector holds |
|---|---|---|
| Scene | put the scene together: the model, shapes you add, where things sit, cameras, lights | whatever is selected |
| Action | make the actions: graphs of nodes (clips, spins, keys set by hand), played smoothly in 3D | how the chosen action moves: root motion, planted feet, amount, a keyed clip’s timing |
| Style | decide how the pixels are made | preset, colours, materials, lines, shading, cleanup, and the look as nodes |
| Asset | cut each action into sprite frames, and the sheets and the files they write | the chosen node of the asset graph: frames per second or picked frames, frame ranges, holds, layout, files, variants |
The tabs across the top are workspaces, and they are yours. A workspace is a name, the step it works on (Scene, Action, Style or Asset) and its own arrangement of panels. Pixor starts with one for each step. Right-click a tab to handle it the way a panel is handled: Duplicate it, rename it, Move it left or right, delete it (Delete NAME, at once), or make a new workspace of any step (New Style workspace…), or a New custom workspace: one empty area, to split and fill as you like; the + at the end of the strip adds one too, and a tab is dragged along the strip to reorder it. Two Style workspaces — one with the graph tall beside the sprite, one for tuning colours — are two tabs, each remembered with its panels. Show beside on another tab’s menu splits the window: the workspace you are on to the left, that one to the right, each its own step with its own panels — the style graph beside the asset graph, say. Stop showing beside on its menu puts one back.
A panel belongs to one step. The step of the workspace you are on decides which panels are there, and the Panels menu (Panels in this workspace) offers only the ones that step is about:
| Step | Its panels |
|---|---|
| Scene | Outliner, 3D View, Scene graph, Inspector, History |
| Action | Outliner, Actions, 3D View, Timeline, Action graph, Clip editor, Inspector, History |
| Style | Styles, 2D View, Style graph, Inspector, History |
| Asset | Assets, 2D View, Asset graph, Timeline, Inspector, History |
The Panels menu also has Reset the panels, which puts the workspace
shown back to how its step ships, and Save workspace… and Use
workspace…: a .pixorlayout file holds a whole workspace — its name, its
step and its panels — and Use workspace… adds it as a workspace of its
own beside the one shown. A workspace file (and a --ui-test script) names a panel by its title in lower
case, with hyphens between the words: outliner, 3d-view, 2d-view,
scene-graph, style-graph, asset-graph, clip-editor, empty-area.
The window header holds the Project menu (New project (Ctrl+N), Open project… (Ctrl+O), Save project (Ctrl+S), Save project as…, Save as blueprint…, Duplicate scene, the recent projects and Quit (Ctrl+Q)), Import… (Ctrl+I) — it takes every format Pixor reads — and, right after it, Export (Ctrl+E) on the left, the project’s name in the middle, and on the right undo, redo, the History and the Panels menu, then the UI size, the preferences and help. The interface speaks ten languages — English, French, Spanish, German, Brazilian Portuguese, Italian, Russian, Simplified Chinese, Japanese and Korean: the system’s language at first, any other in Preferences › Language. The files Pixor writes, the names of what you make and the command line stay as they are. Under it, the row of workspace tabs ends on the right with Play/Pause, four selects every step shares (and, with several scenes, a Scene select before them) — Camera, Action, Style and Asset, each its icon and what is chosen. Action, Style and Asset are independent pipelines; the first two take the header’s choices as their inputs — the Action step plays the chosen action seen by the chosen camera, the Style step draws it with the chosen Style. The Asset step does not follow them: an asset graph’s Sprites nodes name their own camera, action, Style, part set and cut, and the Export window starts with the Asset pipeline the Asset select chooses (see the asset graph and the Export window).
The project’s name is in the middle of the header, and in the
window’s title: Untitled project for a new one — made empty, from an
imported model, a sample, a blueprint or the first-run screen — and the
name you give it after. Once saved, the file it is in follows in
parentheses, Crown jewels (crowns.pixor); the model imported into it is
never named there. Click the name to rename the project: it becomes a
field with the name selected, Enter or a click elsewhere keeps what you
typed, Escape keeps the old name, and an empty name is refused. A rename
is one step of the History and an unsaved change. Save project as…
suggests a file named after the project; saving keeps the name, and
renaming never renames the file. Scripts set it with
pxr project set P --name NAME.
Unsaved changes are asked about before they are lost. Closing the
window (its close button, Quit or Ctrl+Q), and anything that puts
another project in this one’s place — New project, Open project…, a
recent project, a file dropped on the window or opened from your file
manager while Pixor runs, a library item, a choice on the first-run
screen — asks Save changes to NAME? first: Save (Enter), Don’t
save or Cancel (Escape). Save on a project never saved asks where
first, and nothing goes on unless it saved; a save that fails leaves the
project open with the error. Don’t save also throws away the autosave, so
those changes are not offered back next time. Unsaved means different
from what was last saved or opened (the name in the middle of the header
ends in *): a model just imported, a sample or a blueprint’s project
left as it was made asks nothing, since it can be made again; one
recovered from an autosave was never saved, and asks until it is.
The middle of the window is a view, and only a view. Scene and Action have the 3D View. Style and Asset have the 2D View, which shows what the chosen node of the step’s graph makes:
- in Style, the picture the chosen node hands on — or, with the Output node or nothing chosen, the finished sprite with its tools (grid, onion skin, lighting preview);
- in Asset, the sprite list a Sprites, Frame range or Hold node gives, playing, cut, sliced and layered as it will be written; what a node between hands on, the file an output node will write (a PNG, an animation playing, a JSON as text), or the sheet a Sheet node makes (or the whole sheet, with nothing chosen). Layer above it picks which layer of the sheet is drawn, or All, stacked: the sheet’s layers stacked as an engine stacks them, a switch for each, live or read back from the exported files. List picks which sprite list is shown, and Sheet of which camera (which side) of what the chosen Sprites node renders.
There is no Sheet, Layers or sprite lists panel: a sprite list is an input node of the Asset graph, and everything else they did is a way of looking in the 2D View.
Everything the 2D View shows moves one way — the sprite, the held render beside it, the board, a node’s picture, a CRT’s screen, the sheet, the stacked layers, a written picture, a JSON or any other text:
| Do | To |
|---|---|
| Scroll (or pinch) | zoom about the pointer, a notch the same step as in the 3D View and the graphs |
| Drag with the middle button (or Alt and the left) | move it |
| Home | fit it again: the biggest whole zoom that holds it (a text, as big as it is) |
| - and + on the sprite’s bar | zoom a notch out or in |
It first shows each picture fitted. The zoom is in the bottom right corner (on the sprite’s bar for the sprite), as a percentage. Between whole steps the pixel art stays pixel art: every pixel is drawn as whole screen pixels, and two neighbours differ by one screen pixel at most. A text zooms its letters.
Every step’s workspace starts laid out the same way: its list down the left, its view in the middle, the Inspector at the right, and its graph along the bottom —
| Step | Left | Middle | Right | Bottom |
|---|---|---|---|---|
| Scene | outliner, the whole height | 3D View | Inspector, the whole height | scene graph, under the 3D View only |
| Action | actions | 3D View, playing the action | Inspector | action graph, the whole width (timeline and clip editor behind it) |
| Style | styles (every Style) | 2D View | Inspector | style graph, the whole width (its node library down its left, as every graph’s) |
| Asset | assets (every Asset pipeline) | 2D View | Inspector | asset graph, the whole width (a timeline behind it; every export setting is on a node of it) |
A click in a list shows that Style or Asset pipeline in the step’s graph and 2D View — the same choice as the header’s select of that kind, and the status line says so (Showing the Asset pipeline icons). The button under the list — New Style, New Asset pipeline — makes a copy of the one shown, named after it (Pixel Art 2, Main 2), and a row’s right-click menu renames it, Duplicates it, deletes it (Delete NAME…, which asks first: any one, the first too, while another is left), and Save kit… and Use kit… share it as a kit. Drag a row up or down to reorder the list (one undo step a drag).
The Inspector is in all four and shows that step’s subject; History opens in any of them. Everything else is where its own work is: the outliner lists what is in the 3D scene, so it is in Scene and Action (for picking what to move); the asset graph writes files, so it is in Asset and nowhere else. History is a tab behind the Inspector.
Drag any panel by its tab to move it: onto another area’s title bar to join its tabs, onto the middle of an area to do the same, or near one of its edges to split it — including into a workspace whose step it does not belong to, if that is how you want to work. Right-click a title bar (or press the arrow at its right end) for the area’s menu: split it, close the panel, add another one here. There is no close button; the Panels menu brings a closed panel back. The icon at the left of a title bar is the area’s kind (each graph panel shows its step’s icon; the Timeline has a ruler, the Actions list the Action icon, the Clip editor the keys icon), as in Blender: click it and pick another of the step’s panels, and the area shows that one instead (a panel already on screen elsewhere trades places with it). Panels always follow the window: resize it and every area grows or shrinks with it, none folds away. Reset the panels in the Panels menu puts the workspace back to how its step ships.
- Outliner (Scene and Action, left): everything in the scene as a tree. Click a row to select it, Ctrl+click or Shift+click to select several (see Choosing several); its + adds to the scene. What it adds — another model (an item), a prop on a bone, a shape, a picture, words, a volume, a lamp, an effect, a piece of the world — is a node of the Scene graph, and the row and the node are one thing: choosing either chooses the other, and deleting either deletes both. The + menu, like every graph’s Add menu, is laid out in as many columns as the window needs to show it whole; where even the columns would not fit (a small window, large text or roomy spacing) each group is a submenu.
- Inspector (right): the settings of whatever the step is about.
- History (a tab behind the Inspector): every change you have made, in order. See Undo and history.
- 3D View: Tab fills the window with it and back again.
- Actions (Action, left): the project’s actions, and its routines under them.
- Styles, Assets (left of Style and Asset): the project’s Styles and Asset pipelines.
- Timeline and Clip editor (Action, tabs beside the action graph): the frames of the action shown, and the keys and curves of its chosen Clip or Keyframes node. In Asset the Timeline is behind the asset graph, for picking a Sprites node’s frames by hand.
Selecting works the same everywhere: a row in the outliner, a part, camera or light in the 3D scene, or an action in the Actions list. Picking a thing in the outliner or the 3D scene goes to the Scene step, where its properties are (in Action it stays, to be keyed); clicking in the timeline or the sheet leaves you where you were.
Choosing several
The selection can be several things, one of them the primary: the one clicked last. The gizmo sits on it, a camera that is primary is the one the 3D View shows, and its node is the one the Scene graph shows big.
| In the Outliner | Does |
|---|---|
| Click | chooses that row alone |
| Ctrl+click | chooses it as well, or lets it go again |
| Shift+click | chooses every row from the last one clicked to this one |
| Ctrl+Shift+click | adds that run to what is chosen |
| Ctrl+A, Escape (pointer over the Outliner) | chooses every row shown, nothing |
| Ctrl+D (pointer over the Outliner) | duplicates what is chosen |
| Delete | deletes what is chosen: one question, one undo |
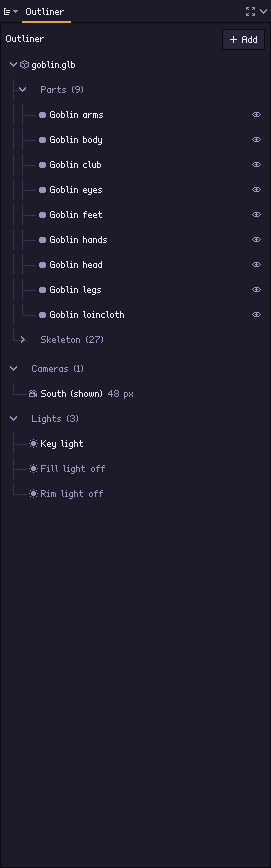
A Shift+click run follows the rows as they are on screen, top to bottom, across the headings (a shape, the cameras and a lamp can be one run), but only rows that are shown: what a folded heading hides is not in it. In the 3D View Ctrl+click adds or lets go as in the Outliner and Shift+click adds (space has no order for a run to follow); the gizmo, and G, R and S, then move, turn or scale everything chosen together, each by as much as the primary moves (a scale by as many times). The Scene graph is the same choice: the rows chosen are its nodes picked, and a box or Shift+click there chooses their rows. Dragging a chosen camera’s row moves every chosen camera with it, a place at a time.
The Inspector with several chosen says what they are (“3 cameras”, “4 objects” when of several kinds) and shows what they share:
- All of one kind: every setting of that kind — for cameras the game, view, pitch, projection, field of view, turn, size, width, height and zoom; for shapes, lamps, volumes and pictures their nodes’ settings.
- Of several kinds: only the settings every one of them has, by the same name and range. A shape, a volume and the model share where they stand (At) and how they turn (Turn); a shape and a part share Shown. A camera and a shape share nothing, and the Inspector says so.
- Names are never shared: two things of one name would each draw both.
A setting they all agree on shows its value. One they differ in is mixed: an em dash (—) in a number, a text or a colour field, Mixed in a dropdown, a dash in a check box. An edit is absolute: whatever you set is set on every one of them, so with every camera chosen, typing 48 in Width and 48 in Height makes every camera’s canvas 48x48. A number dragged starts from the primary’s value and gives them all the number shown. Each edit is one step of the history, whatever the number of things it changed. A camera with no canvas of its own (sized by pixels per metre) has no width: choose Size for all of them first. No camera owns a Style (a Sprites node names the Style it takes), so there is no Style to set per camera here.
Moving around
The header of the 3D panel chooses how the scene is drawn. Where you look from needs no choice: drag and you are in the free view; C over the 3D View (or the header’s Look through) looks through the camera chosen in the header.
| Do | To |
|---|---|
| Drag | orbit |
| Right-drag, middle-drag or Shift-drag | pan |
| Scroll (or pinch) | zoom towards the pivot; a notch is the same step (about 1.22x) as in the 2D View and the graphs |
| W A S D, Q E | fly forward, sideways, down and up (Shift: faster) |
| F, or double-click | frame the model |
| Z | step through the shading modes |
| Tab | the panel under the pointer in full screen, and back (or the button at the right of any panel’s header) |
| C (over the 3D View) | look through the shown camera, or back to the free view |
| P | perspective or orthographic |
| Shift+G | the ground grid in 3D, the pixel grid over the sprite |
| C, D, A (over the 2D View) | the colours this frame uses; what changed since the frame before; hold a render and flick between it and the new one |
| G, R, S | move, rotate or scale what is selected (then X, Y or Z to lock an axis, digits for an exact amount, Enter to keep it, Escape to put it back) |
| Shift+D, X | duplicate, delete (everything chosen) |
| Ctrl+click, Shift+click | choose as well (Ctrl again lets go) |
| . , Home | frame what is selected, frame everything |
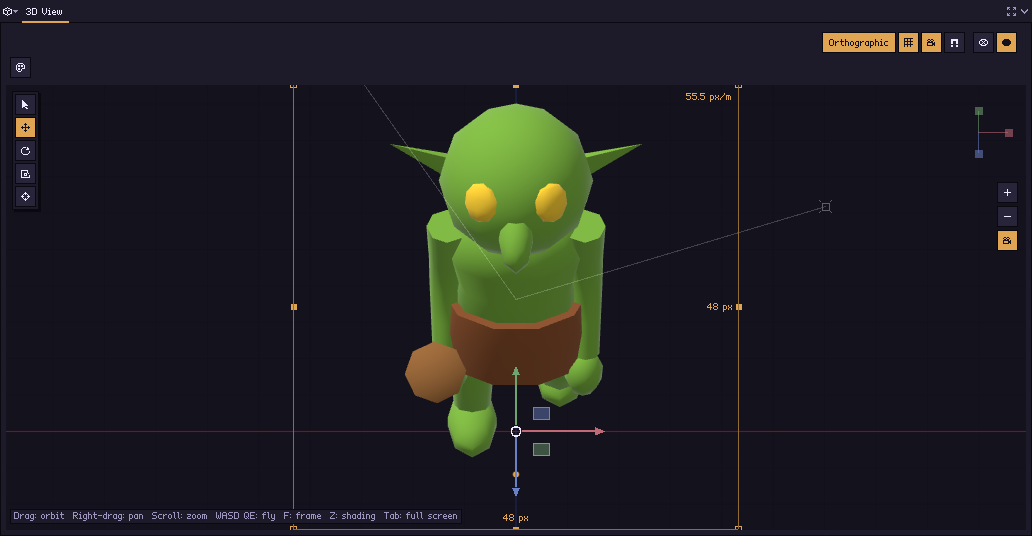
The navigation gizmo in the top-right corner is the scene’s axes: three short stubs with a square cap each. Click a cap to look straight down that axis, and again to look from the other side; drag the gizmo to turn the view. It names an axis while the pointer is on its cap, and dims while the view is turning. Under it are zoom, projection and the camera.
The transform gizmo sits on whatever is selected — the model, a shape, a volume, an emitter; with several chosen, on the primary, and moves them all — with five tools in the 3D View’s toolbar for what it does: Select (no gizmo), Move, Rotate, Scale and Transform (all three at once); G, R and S work whichever is chosen. Drag an arm to change that axis. A move lands on whole sprite pixels, a rotation steps 15 degrees at a time and a scale on whole pixels of size; hold Shift for any of them freely. The same numbers are in the Transform block (Position, Rotation, Scale) at the top of the Inspector.
Shading modes
At the right of the 3D panel’s header, again as in Blender:
| Mode | Shows |
|---|---|
| Wireframe | mesh edges only, with the ones behind hidden. Good for checking how a shape is built, and for lining a model up with the pixel grid |
| Solid | plainly shaded surfaces: the everyday view for moving around |
| Rendered | the real pixel-art pipeline, live from this view, so you see the sprite this angle would make |
Rendered is made exactly as a sheet’s shots are made (the G-buffer on the GPU, every CPU pass), only from wherever you are looking. Ctrl+scroll makes its pixels bigger or smaller, by the same step a notch, in whole screen pixels; they are as big as the 2D View’s sprite pixels.
Cameras
A camera is one side of the sprite: eight sides are eight
cameras. Cameras with the same view, pitch and size are framed together
and write one sheet, a row each; the group of the first camera (South
in a new project) writes the export path, and any other group adds its
camera’s name to it (hero.png, hero_platformer.png).
pxr render hero.pixor writes them all. Drag a camera up or down in the
outliner to reorder them (one undo step a drag); the first camera is the one
the other cameras’ sizes are compared with.
Add one with + in the outliner: A camera for… sets it up for a kind of game. A genre of one side adds one camera named for it; one of several adds a camera for each side, named for the side it sees (South, Southeast…).
| Game | View | Sides | Size |
|---|---|---|---|
| Platformer | side, facing right | 1 (mirror for left) | 32 px |
| Fighting game | nearly side-on | 1 | 128 px |
| Beat ’em up | side, 18° down | 1 | 64 px |
| Point-and-click | 10° down | 8 | 96 px |
| Top-down RPG | three-quarter, 35° | 4 | 32 px |
| Action adventure | three-quarter, 50° | 8 | 48 px |
| Isometric (2:1) | 30° down, 45° around | 8 | 64 px |
| Tactics | isometric | 4 diagonals | 48 px |
| Strategy / RTS | 40° down, 45° around | 16 | 32 px |
| Racing | 12° down | 16 | 64 px |
| Top-down shooter | straight down | 16 | 32 px |
| Shoot ’em up | straight down, facing up | 1 | 32 px |
| Items and icons | 25° down, turned 30° | 1 | 32 px |
Everything stays free afterwards: Game, View, Pitch (negative looks
up from below), Projection, Turn and Size. Ring round the model
adds 4, 8, 16 or 32 cameras like this one, a side each. On the command
line, --camera platformer does the same.
To aim a camera by eye: fly to the view you want in the free view and press Camera from view in the 3D View’s header. Or drag the camera in the 3D view around the model; Shift snaps to 15°.
A camera is orthographic unless its Projection says perspective, and sized Fitted to the model it frames the model itself (so a character never swims): then only its angle and size matter, not where it stands. Canvas and zoom and Pixels per metre fix the frame instead.
Several scenes
A scene is one setup of the objects: the model and where it stands, the scene graph with everything else in it, the cameras, what is hidden, the part sets and the ground. A project starts with one, and with one nothing here is shown. The actions, the Styles and the Asset pipelines are the project’s, shared by every scene: an action names things, so it plays in any scene whose things have those names.
Duplicate scene — at the top of the Inspector in the Scene step, or in the Project menu — makes a second scene, a copy of the one shown, and shows it: the same hero as a 16 px token seen from above, say, or a promo still with a ground and lamps. Change its cameras and objects; the first stays as it was. From two scenes on:
- the header’s Scene select, before the Camera select, chooses the scene every step shows (showing another scene is no change: it is not in the History and asks for no save);
- the Inspector’s Scene section names the scene shown (its sheets are named with it) and removes it;
- an Asset graph’s Sprites node has a Scene setting: every scene, or one. Choosing a Sprites node of another scene in the Asset step shows that scene.
One export writes every scene’s sheets: the first scene’s as the graph
names them, the others’ with the scene’s name added (hero.png,
hero_map.png).
From a script:
pxr project set hero.pixor --add-scene map --view top-down --size 16   # a copy, then edited
pxr project set hero.pixor --scene map --hide Cape                      # edits that scene
pxr project set hero.pixor --rename-scene map:token
pxr graph list hero.pixor --which scene --scene token
pxr graph set hero.pixor --which asset --node sprites --set scene=token
pxr project set hero.pixor --remove-scene token
pxr render hero.pixor                                                   # every scene's sheets
Lights
The key light picks each pixel’s light band and casts the shadows. The fill light lifts the shadow side (strength 0 is off). The rim light highlights edges that turn away from you. Drag the key and fill lights in the 3D scene, or set them in the Inspector.
These three are directions, the same for every side of the sprite, so they are the look’s: part of the Style, listed under Lights in the Outliner to be dragged where you see them. A lamp is different: it stands somewhere in the scene, so it is a node of the Scene graph like a shape (see Parts, bones, props and effects).
Follows the camera (key light, on by default) keeps the light on the same side of every camera, as sprites usually want. Off, the light stays put in the scene: turn a character around and its back is in shadow.
Shapes
Shapes are built in Pixor from parameters, for pickups, props, tile pieces and the blockouts a scene starts from. + in the outliner offers, under A shape: box, sphere, cylinder, cone, torus, plane, capsule, wedge, pyramid, prism, stairs, arch and letters. An arch is a block with a round-topped opening through it — a doorway, a gate, a bridge — and its Curve facets say how round the top is.
A new shape is put beside whatever is there already and framed in the 3D scene, with a move gizmo on it: an arrow per axis, X red, Y green, Z blue. Dragging one moves the shape on whole sheet pixels, so an edge never falls between two of them; hold Shift to move it freely.
In the Inspector:
- Shape size is how far the shape reaches on each axis (Width, Height, Depth), in metres, and is shown underneath in the sheet’s pixels. Segments is how many sides a round shape is built from (a prism’s Sides, a stairs’ Steps) — low numbers give the faceted look that reads well small.
- Transform places and rotates it, and On, under Where it goes, can hang it on a bone, where it follows the motion as a prop does.
- Colour goes through the palette like every other surface.
- Duplicate and Delete are at the top, and Ctrl+Z puts a deleted shape back.
Each shape is a Shape node of the Scene graph, its
settings on the node and called by its name there; a Ring or a Row after it
repeats it. Shapes are saved as parameters, not as meshes, so projects stay
small and every rebuild gives the same vertices. On the command line:
pxr project set x.pixor --add-shape box:1,0.5,1:0,0.25,0:#c86432, or
--shape on a render.
Export all as glTF… at the top of a shape’s Inspector writes every shape in the
scene to a .glb, one node per shape with its colour. Shapes live in the
project as parameters and normally leave Pixor as pixels; this is the way
back to geometry, to carry on in a modeller or drop into an engine. On the
command line: pxr shapes project.pixor -o shapes.glb, which also takes
--shape specs without a project.
Pixor is not a modeller: there is no vertex editing, no booleans and no sculpting. Blender covers those: export the result as glTF and open it in Pixor.
Deleting
Whatever can be added can be deleted, two ways: right-click it and choose Delete NAME… (an outliner row, an action, a routine, a list row, a key, a graph node or note, a workspace tab, a part set, a variant), or choose it and press Delete. Delete deletes what is chosen in the panel under the pointer: the outliner’s selection (all of it, when several things are chosen: one question, Delete 3 shapes?, and one Ctrl+Z), the Styles, Sprites or Assets list’s row, the clip editor’s picked keys, a graph’s chosen node, the workspace tab shown. Pixor asks first (Delete NAME?, Enter says Delete it), and Ctrl+Z puts it back; a workspace tab’s own Delete NAME acts at once. What came with the imported model — its parts and bones — is the model’s, and is not deleted here.
Undo and history
Every change is a step. The History button beside undo and redo in the window header brings the History panel to the front, a tab behind the Inspector; pressed again, it puts the Inspector back. It lists the steps in order with the one you are on marked. Click a step to go straight back to it. Steps you have undone stay in the list, faint, because they are still there to redo.
The undo and redo buttons name what they would take back or put back (“Undo Added the shape crate”), and the status bar says what they did. One drag of a slider is one step.
Parts, bones, props and effects
- Parts: the eye hides a part in every sheet. Selecting a part sets its hitbox or hurtbox (written into the JSON export) and names the material it is made of; what the look does to that material is in the Style step, under Materials, because it applies to every part that shares it.
- Skeleton: selecting a bone makes it a socket (its position goes into the JSON), lets it swing with the motion (spring bones, for hair, capes and tails), or attaches a prop to it. While a keyed clip is shown, G, R and S over the 3D scene pose the selected bone — or the selected part, where no bone moves it (a wheel) — and what they change is a key at the frame shown (Keys set here); the model itself moves when the model is selected. A keyed turn counts on past half a circle, so a wheel keyed from 0 to -360 spins.
- Props, effects, lamps and volumes are added with +. An effect’s diamond can be dragged in the 3D view; a volume’s size and place are typed in its Transform (Volumes). A lamp lights what is near it on the palette’s own steps: its place is in Transform, and its Inspector says which bone carries it (Carried by: a torch in a hand), how far it reaches (Reach), how strong it is (Strength), how it falls off (Falloff), and whether it is a cone aimed at a point (Cone angle, 0 for none, and Aim): the rows its node shows in the Scene graph, under the same words, as a volume’s are. Effects, lamps and volumes are nodes of the Scene graph: a Row after a lamp is a row of lamps, and one wired into nothing is not in the scene. A prop and a spring are nodes of it too — Prop and Spring — but they change the model rather than stand beside it: every copy of the import carries the prop in its hand and swings with the spring, wherever the node is in the graph.
Props on bones
A prop is another model held by a bone: a sword, a shield, a torch, a flag. It comes whole — its own nodes, skins and clips, not only its triangles:
- Held by its grip. A node of the prop called
grip(orattach,socket,hold) is what the bone holds, turned as the bone is; Held by names another node, and without one the prop’s origin is held. An empty at the handle, placed in the modeller, is all a sword needs to sit in any hand. - Held in two hands. A second empty called
grip2(orforegrip,offhand,support) is where the other hand goes: a greatsword’s pommel end, a rifle’s foregrip, a staff’s far end. Every frame, whatever the clip does with that arm, its upper arm and forearm turn so the hand lands on it; the elbow keeps the side it bends to, and a grip out of reach is pointed at. - Offset, Rotation X/Y/Z and Scale move it from there on the bone’s own axes, in metres and degrees; the prop keeps its size in metres even on a rig in centimetres.
- Its own motion plays. The prop’s clip of the same name plays under each of the model’s clips; otherwise its first clip, over and over, so a flag waves while its bearer walks. Only its own parts move that way: a clip that turns the whole prop (a pickup’s turn) is left to the hand. A model that does not move takes the prop’s clips as its own.
- Its nodes can be sockets. They are named
prop/node, so--socket sword/tipputs the tip of the sword in the JSON, frame by frame. - A bone named another way is found, as clips are: a project that holds
its sword in
hand.Rstill does on a Mixamo rig (mixamorig:RightHand).
On the command line: --prop sword.glb:hand.R@at=0,0.05,0@turn=0,0,90, and
pxr project set P.pixor --add-prop … takes the same and adds a Prop node
(pxr graph add P.pixor --which scene --node prop --set model=sword.glb --set bone=hand.R is the same node a setting at a time).
Actions
An action is the motion of the whole scene: a walk, an attack, a turntable, the light sweeping round — what plays, on every object, over its frames. A scene has as many actions as it needs, and each becomes sprites in the Asset step.
The objects have motion of their own: a model’s clips, and the keyed clips made here, each made of channels — a bone’s rotation, a part’s position, the part set shown — keyed over time. An action plays them: the one a model’s clip names, or a keyed clip that keys many objects at once. A routine is channels made once and played inside any action by a Routine node; it is never exported by itself.
The Actions list holds the project’s actions: its clips, and the
turntable, light sweep, colour cycle, motion loops and effects, then the
project’s routines under Routines. What goes in the sheets is not said
here: the Asset graph’s Sprites nodes take the actions they name, and
one of Every one except Static (a new node’s) takes every action of this
list but Static (see the asset graph).
A clip of the model the project does not have (one deleted from the list,
or a project made without it) is added back from Add an action ›
Model clip: NAME. Drag a row up or down to reorder
it: clips move among clips (the sheet’s row order), actions among actions,
one undo step a drag. Add an action under the list
offers New action, New routine, Clips from a file…, the model’s
clips the project does not have (Model clip: Sway…), the motion
library’s clips (Library clip: walk…), Keyed action, and ready-made
actions: Turntable, Light sweep, Colour cycle, Spin, Bob,
Swing, Pulse, Squash, Flicker. A loop is made exactly as
--motion makes it, on the thing chosen (Flicker on the light). Selecting an action shows its settings in the Inspector: how it moves (root motion, a keyed clip’s
keys, how many seconds a turntable takes to go once round). How it is
cut into frames (frame rate, smart frames, frames picked by hand) is said
by the asset graph’s Sprites node that takes it.
Actions are made here, and only here. The Scene graph places things;
it makes no actions. A copy the Scene graph’s Play node gave a clip of
its own plays it over any action’s frames: a windmill turning beside a still
house is a New action of so many frames (its Output node says how many)
and a Play node on the windmill. From a script, pxr project set game.pixor --add-action windmill, then pxr graph set game.pixor --which action --pipeline windmill --node output --set frames=8.
A turntable turns the model, not the cameras: every camera sees the same model go round under a light that stays where it is, as on a real turntable, and a keyed camera still moves on top of it.
Holding one frame longer. In the Asset step, with a Sprites node chosen,
beside the frame counter under the Timeline is
Hold (ms), the shown frame’s hold in milliseconds. Change it and that frame of the clip
is held that long in every sheet, JSON, GIF and .aseprite — the wind-up of
an attack held, the follow-through quick — while the other frames keep what
the cut gives them; Reset the hold gives it back. The hold is the
action’s, counted in its own frames before a Frame range and before a Hold
node, so every Sprites node that takes the clip keeps it. Elsewhere the
Timeline shows the hold without changing it.
pxr project set game.pixor --hold attack:2:300 does the same.
Pipeline stages
Pixor turns each frame into pixel art in steps: a G-buffer from the GPU, the resolve to pixels, shading, lines and cleanup. Every stage is a node of the Style graph, and choosing a node shows what it makes in the 2D View; there is no separate stage picker. The camera’s render is a Layered Render group with one output per layer; open it (the arrow at the right of its title) and each layer is a Layer node inside it:
| Layer | Shows |
|---|---|
| Albedo, Normals, Depth, Part ID, Material ID | what the GPU drew for each pixel |
| Coverage | how much of each pixel the model covers |
| Key light, Shadow | the light before banding, cast shadows |
After it come the Light and shade group (open it: Light bands, Highlights…), the Line work group (Silhouette, Edges, Tidy lines…), Combine, the Cleanup group and the Palette: each node inside shows its own picture too.
In Style, the status bar explains the pixel under the pointer: its part, material, colour, normal, depth, coverage, N.L, shadow, band, and how close it is to the depth step and the crease angle. The Report section of the Inspector lists what the checks find (thick lines, corners, orphans, off-palette pixels).
The sensitivity settings (Line sensitivity and the like) show their stage while you drag them: the crease angle and depth step show edges, the band edges show bands, coverage shows coverage. Let go and the finished sprite is back.
On the command line, pxr stages model.glb -o stages/ writes a picture of
every stage (see Command line).
Keys set here
A model file brings its clips. Anything you build in Pixor — a shape, a group, the imported model itself — is animated with keys instead (Add an action › Keyed action under the Actions list).
A keyed clip is a clip: sides, frame picking, holds, root motion and
export all work on it exactly as they do on an imported one. Its root, for
root motion, is the highest bone it keys in place: a walk baked from a
Mixamo clip that travels (pxr project bake) is pinned in place, and the
JSON gives each frame’s offset for the game to move the sprite by.
Clips from another file come in with --anim FILE (pxr project new and
set, as pxr render takes it): a Mixamo clip on a rig named otherwise finds its
bones by what they are, and the motion library’s lib:walk, lib:run …
are clips a project can list like the model’s own.
| Do | To |
|---|---|
| I over the 3D scene | key the whole transform of what is selected, at the frame shown |
| Alt+I | take those keys back |
| the diamond beside a field | key that one number; a filled diamond means there is a key here, a dim one means the channel has keys elsewhere |
| click a row of keys | choose the key nearest where you clicked, and go to its frame |
| drag a key | move it to another frame (Shift: leave a copy behind); every picked key moves with it |
| drag across a row where there is no key | a box: every key it covers is picked |
| Shift-click a key | add it to the picked keys, or take it out |
| Reaches the next | how this key gets to the next one: Step holds it (the default, because pixel art is mostly stepped), Linear goes evenly, and the eases start or end gently |
| New keys reach the next, on the clip’s action | the curve a new key takes where its row has no key yet to follow: step until it is set, so a clip that is all spins and flights is made linear once rather than key by key |
| Poses | copy the pose at this frame, paste it here, paste it mirrored left to right (half a walk becomes a whole one), reverse the clip, or make the last frame lead back into the first |
A clip of the model’s own — from its file, a clip file or the motion
library — is taken whole. Turn into keys on its action makes a clip made
in Pixor from it: every bone it moves, keyed at every frame, to change key
by key; the clip itself stays as it was (pxr project bake game.pixor walk).
Keys land on whole frames at the clip’s own rate. There is no sub-frame time, so a clip gives the same frames everywhere and a project file stays small and readable.
A rotation is keyed as three angles. Between two keys that key its angles together — on the same frames, reaching the next the same way — a rotation about two or three axes at once goes as one rotation, the way the clip it may have come from went; a rotation about one axis goes by its angle, so 0 to 720 about Y spins twice, and a spin about one axis while another tilts still goes round the way its angles say.
From a script: pxr project key game.pixor shape:coin "turn y" --frame 4 --value 180 --how linear --clip spin --frames 8 (a file names the
channels Position X, Rotation Y and Scale Y as x, turn y and
size y). Without --how a key takes
its row’s curve, or the clip’s: --curve linear sets the clip’s.
Part sets
Expressions, equipment and damage states are geometry that is shown or hidden, which palette variants cannot express. Hide the parts you want out of the way in the outliner, then Save what is hidden as a set under Part sets in the model’s Inspector. Click a set to show it; key it with the diamond beside it, and a clip can blink, swap a weapon or take damage frame by frame.
A part set is an index, so its keys are always stepped: half of one set and half of another is nothing.
A set can also be a whole sheet: name it in a Sprites node’s Part set in the asset graph, and every clip is rendered again with that set on for every frame — the same walk with the helmet off, in its own sheet or beside the first. Those rows show in the action list as walk · no helmet.
From a script, a part set is keyed by its name: pxr project key hero.pixor model "part set" --clip blink --frame 1 --value closed. --hide PART,…
and --show PART,… leave parts out of every sheet, as the eye does.
In a scene of several items, a set can hide a whole item by its file’s
name (turret for turret.obj) or its place (item 2). From a script,
--part-set NAME:PART,PART (repeatable) makes a set and --no-part-sets
clears them. A tank whose turret turns on its own, at thirty-two angles,
over a hull at eight, is two items, a camera for each and a set for each:
pxr project new tank.pixor --item hull.obj@0,0 --item turret.obj@0,0 --size 48 \
  --ring 8 --add-camera "turret:three-quarter:48" --ring-of turret:32 \
  --part-set hull:turret --part-set turret:hull
pxr graph set tank.pixor --which asset --node 0 --set 'camera=turret*' --set part_set=turret
pxr graph add tank.pixor --which asset --node sprites --alone --set camera=South,Southeast,East,Northeast,North,Northwest,West,Southwest --set part_set=hull
pxr graph add tank.pixor --which asset --node merge --alone --in 0=0 --in 1=4
pxr graph wire tank.pixor --which asset --from 5 --to 1 --slot 0
A project of items alone needs no --model.
Each --item is an Item node of the Scene graph,
added to the end of its chain. In the app, + › An item › From a model
file… in the outliner adds one beside what is there; it is listed under
Items in the outliner by its file, its parts are named item N: … (N
counting the Item nodes in the order the graph holds them), which is what a
part set calls them, and its Inspector places, rotates and scales it,
gives it a clip of its own (Its own clip), or Deletes it. Import… (Ctrl+I) in
the window header is different: it replaces the model and
keeps the look.
What can be keyed
| Target | Written | Channels |
|---|---|---|
| the imported model | model |
Position, Rotation, Scale |
| a bone of its rig | bone:NAME |
Position, Rotation, Scale — posed with G, R and S in the 3D view, each change a key (R, X, 9, Enter turns it nine degrees about X); a number the clip does not key is the bone’s rest pose |
| a part of the import no bones bend | part:NAME |
Position, Rotation, Scale, about the part’s middle — posed with G, R and S as a bone is (R, Z, -, 3, 1, 5, Enter on a wheel’s last frame, in a clip whose new keys are linear, spins it) |
| a shape built here | shape:NAME |
Position, Rotation, Scale |
| a volume | volume:NAME |
Position |
| a picture or a text card | picture:NAME |
Position, Rotation, Scale (about its foot) |
| an effect’s emitter | effect:N (1 for the first) |
Position, while the effect plays under this clip |
| a camera | camera:NAME |
turn and pitch, added to its own; the other cameras stay where they are |
| the key light | light |
turn (azimuth) and pitch (elevation), and intensity (1 is the look’s own, 0 as if every surface faced away) |
| a material | material:NAME |
glow (0 to 1, for a glowing material) and ramp shift (whole steps along its ramp) |
| a picture made of frames | picture:NAME, frame |
which frame of the strip it shows, from 0 |
| the part set | model, part set |
which set is shown |
The look keys are what a pixel artist animates without moving anything: a torch whose glow flickers, a rune that pulses a step up its ramp and back, a light that dims over a loop, a flag painted as four frames. Ramp shifts and frames are whole numbers, so their keys always step.
pxr project key hall.pixor light intensity --frame 0 --value 1 --clip dusk --frames 8 --how linear
pxr project key hall.pixor light intensity --frame 7 --value 0.3 --clip dusk
pxr project key hall.pixor material:rune "ramp shift" --frame 4 --value 1 --clip dusk
A part is a piece of the imported model by its name, as the outliner shows it: a car’s wheel, a chest’s lid, a turret’s barrel. A model with no rig can be animated this way without a round trip through Blender: the part turns about its own middle, as a wheel spins on its axle, and every piece of that name turns with it (a tyre and its hub cap). Select the part and its keys are under Keys on this part (Rotation, Position); on the command line:
pxr project key car.pixor part:wheel_fl "turn z" --clip drive --frames 8 --loop yes --frame 0 --value 0 --how linear
pxr project key car.pixor part:wheel_fl "turn z" --clip drive --frame 8 --value -360
A part a skin bends is its rig’s to move, so it cannot be keyed on its own.
An emitter’s keys are read when its effect plays under the keyed clip (the effect’s Clip): a fireball’s fire flies with it, a torch’s smoke follows the torch the clip swings.
A camera key turns one camera about the model — the one it names, since a
camera is one side of the sprite — so a keyed orbit on a top camera
leaves a ring of eight sides standing still. Renaming the camera takes its
keys along. A light key aims the key light: a torch swinging, a sunrise over
a loop.