Sprites for isometric games
Isometric pixel art follows strict rules for its lines. A camera set to the 2:1 view follows them for you, on every building and every side.
| View | isometric 2:1 |
|---|---|
| Size | 96 px buildings, 32–48 px characters |
| Sides | 4 |
Sample project
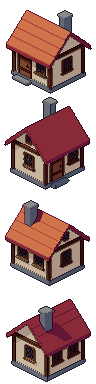
Isometric building: the .pixor project and its library model (CC0). The sheet on the left is what it renders.
What an isometric game needs
Isometric games are built from pieces that fit a diamond grid: floor tiles, wall pieces, buildings, props and characters. City builders and strategy games lean on buildings and terrain. Tactics games and RPGs need characters too, usually in four or eight directions.
Drawing these by hand is slow because every line has to follow the grid, and every rotation has to be redrawn. A 3D model rendered through an isometric camera gets the lines right on each side.
The camera
Use the isometric 2:1 view. Floor edges step two pixels across for every pixel up, which gives the clean, regular staircase lines isometric pixel art is known for. Isometric pixel art explains why 2:1 is the usual choice.
Buildings need room. The sample house renders at 96 px, which leaves space for a roof, windows and a door that read clearly. Characters are smaller, usually 32 to 48 px, and props sit between the two.
Render four sides. A building seen from each corner lets the player rotate the map or lets you place the same house facing different ways. Characters can use four or eight.
Scale and pivot
One pixels-per-metre scale for the whole project matters even more here than in other genres. If a house is rendered at one scale and a barrel at another, they will not sit on the same grid. Pixor keeps one scale per project, so sizes stay true to the models.
Put the pivot where the object meets the ground, at the centre of its footprint. Pixor fixes the pivot to one pixel, so every side and every frame lines up on the tile.
Animation
Buildings are mostly still, but small loops bring a map to life: a flag waving, a well being cranked, smoke or fire. Keep them short and slow so a screen full of them stays calm. Pixor holds flicker down between frames, which matters on large, detailed sprites. For characters, the motion library’s idle, walk, run, attack, hit and death work on any humanoid skeleton. See animation.
Palette
Isometric scenes show a lot at once, so a shared palette keeps them from looking noisy. Light bands give buildings clear lit and shaded faces, which helps the eye read the shape. Hue-shifted ramps keep shadows from turning muddy. Pixor has seven palettes built in and reads Lospec .hex and GIMP .gpl files. See palette ramps.
Free library assets that fit
- Buildings: house-small, house-medium and house-large.
- Town props: the well, market-stall, cart, fence, lamp-post and flag.
- Nature: the pine-tree, boulder and pond.
The village set puts many of these together in one scene.
Setting it up in Pixor
- Import your model, or open the isometric sample.
- In the Scene step, click the camera “South” in the Outliner. Its “Game” setting sets it up for a kind of game in one click; choose an isometric game.
- Use “Ring round the model” to add 4 cameras. Set Width and Height large enough for the building, such as 96 px.
- In the Action step, pick an animation if the model has one.
- In the Style step, pick the look.
- Export writes the sheet. Pixor can also export normal or depth maps; see exports.
Questions
What does 2:1 mean?
Floor lines go two pixels across for every pixel up. That gives clean, regular stair-step edges, which is why most isometric pixel art uses it.
Why four sides for a building?
If the player can rotate the map, or the same building is placed facing different ways, you need each corner. Four sides cover them all. A building that never turns needs only one.
Can characters use the same camera?
Yes. Use the same view and the same project scale, so characters, props and buildings line up on one grid.